Notice
- This machine does not require an induction.
- This tool may be used while alone in the space.
Model: USCutter MH 721
Condition Notes
- USB-B socket delicate, please be gentle! (Replaced socket 28/10/2025.)
- Serial port did not appear to work
- Embedded Raspberry Pi does not appear on network.
- Needs cleaning
- Blade replaced 26/10/2025. More blades in shelf underneath plotter.
Maintainers
@nobody
Risk Assessment
Identify risks
- low risk
- risk of entrapment; keep hair, clothing and extremeties away during operation
- sharp objects
- computer controlled movement
State control measures
Operation
Cutting procedure
- Turn on via power switch on side.
- Press ‘Offline/Pause’ button. Yellow light on means offine.
- Now the arrow pad will move the cutter head and material feed back and forth.
- Put your material in from the back. There are three rollers to hold it firm. You want these spread across your material. To move them sideways and allow material to slide underneath, flip up the lever on each roller mechanism at the back. To get the material as straight as possible in the machine you there is a ruler on both sides that you can use.
- Put the cutter where you want it to start, i.e. the 0,0 of your drawing. Press ‘Origin’.
- You probably want to do a dummy pass over your material before committing with the blade. Remove cutting piece (the cylinder holding the blade) by unscrewing the brass clamp and lifting it vertically out. Note the ridge that positions it vertically by sitting on the top of the clamp.
- Attach the plotter via USB
- Press ‘Offine’ again to turn the yellow light off and put it online, i.e. responsive to computer input.
- Hit ‘Go’ on your computer however you are doing that (see below).
- Watch the plotter go, noting whether it looks like it’s got the scale and position correct. Hopefully do not watch the cutting head crash against the far side, etc.
- Tweak material, origin, source document if needed, and repeat dummy runs until happy.
- Now put the blade back in. Remember the ridge sits on top of the clamp to stop the cylinder falling through.
- Test cut: like the laser cutter, getting speed and blade downwards force settings can make or break your day. Position the cutting head somewhere you will discard, and hit the ‘Test’ button. Verify it’s cut through the vinyl but not all the way through to the backing. The arrow keys now control speed and force.
- Now it will actually cut, if there’s no tension holding the front of the material taut, it might bunch up caught on the cutting point instead of cutting through while passing underneath. This is bad. So apply some light tension to the front of your material if you’re cutting near the edge (which you probably are; e.g. pull very lightly, or use fingers to hold it down flush).
- Hit ‘Go’ on your computer.
Browser-based control
There is a black USB cable hooked into a Raspberry Pi Zero W that is housed inside the machine on the righthand side. This will draw power from the machine when turned on.
Then you can upload an HPGL file from any device connected to the SLMS WiFi by visiting http://vinyl.space.southlondonmakerspace.org/
Computer control
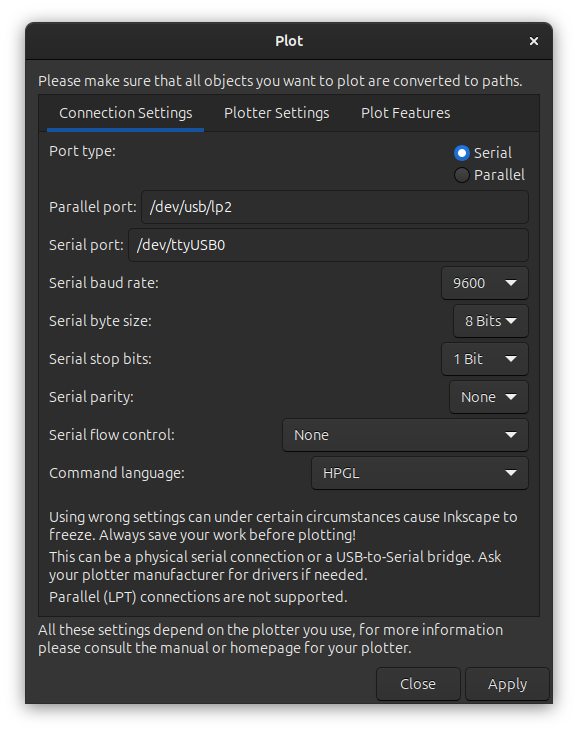
If you are using Inkscape, you can send your artwork to it via an extension. Extensions → Export → Plot. Select the port type to be serial, enter the serial port name (see below), then click “Apply”.
Otherwise, there is no neat GUI commonly in use yet. On Linux + Mac OS X, we send a HPGL file (e.g. .plt, .hpgl) to the plotter, and the plotter plots it.
In a terminal it is something like this –
cat foo.hpgl > /dev/bar
where foo.hpgl is your drawing to cut, and /dev/bar is the device that appears when you plug in the USB cable.
On Makerspace’s Linux Thinkpad T42 it’s this: /dev/ttyUSB0
On a Mac, it’s likely this: /dev/tty.wchusbserialfa140 (see note below)
So how do you get the HPGL file from your drawing? Inkscape is currently the best bet. Save a copy... will allow you to export a HPGL file from your SVG or whatever artwork.
Finding the /dev/ port
To find the device, type this into a terminal window:
ls /dev/ | grep -i usb
Hopefully, a device will be listed. Ignore any cu., you want the tty one.
If there is no device, first check the plotter is powered on, and if there’s no issue at that end it’s likely you don’t have the driver for the USB serial chip that’s inside the plotter. It’s a CH340S. There is a driver suitable for Max OS X Sierra here. Install, reboot, and you should see the USB device once plugged in.
Inkscape advice
- Set document size to the extents of your artwork. This is needed to ensure correct scale.
- Select the artwork
File>Document Properties>Resize page to drawing or selection
- Make everything in the drawing raw paths, not Type etc.
Edit>Select AllPath>Object to Path
NOTE: Toby has seen some erratic behaviour from Inkscape when resizing artwork. These instructions should be expanded if/when others hit issues.
Maintenance
Clean dust off the machine.
Cutter blade maintenance. The cutter uses Roland compatible blades. No adjustment of the cutter assembly during normal use – it’s expected to cut through vinyl, but not go all the way through the backing material. When blades are replaced, the blades should be fitted with 0.4mm or less of the blade tip protruding from the mounting.
Note - cutting materials without backing material is possible but beyond the scope here. It requires a low-tack backing material, likely involves adjusting the blade height, and typically wears through blades much faster. And the laser cutter may well be the more appropriate tool.
Supplies
Vinyl tends to be specific to the project, e.g. colour, temporary adhesive, permanent adhesive, garment heat-press. Makerspace may have offcuts, but in the main members are expected to source their own.
@tobyspark has had good experiences with http://mdpsupplies.co.uk who have everything, in every size, often with instructions.
References
eg. instruction manuals, tutorial videos etc.
USCutter MH series user manual https://uscutter.com/content/PDFs/MH_Manual_09172019.pdf
A quick search of Cutter Plotter 721 filetype:pdf came up with this document with various notes of varying usefulness: http://www.mystat.com/user-guide-tips-fixes-uscutter-mh.pdf
Blog posts by the person who fixed driving plotters in Inkscape:
https://www.timewasters-place.com/your-cutting-plotter-and-inkscape/
https://www.timewasters-place.com/inkscape-and-plotters-the-2nd/
https://www.timewasters-place.com/inkscape-and-plotters-the-3rd/
Troubleshooting
The linux user should be added to the group dialout.
The above instructions assume the printer is mounted as ttyUSB0. If this is not the case run
run following command dmesg to determine port used.
dmesg|grep ttyUSB
This gives something like
[11077.039523] usb 1-1.5.3: ch341-uart converter now attached to ttyUSB1
Scanning for a line mentioning ttyUSB, we can see that in this case the required port is ttyUSB1
Mac OS X 10.12 aka Sierra
On Mac OS X Sierra, me (Toby) plugging in the USB cable didn’t turn up an appropriate /dev entry. System Profiler has a USB device with
Product ID:	0x7523
Vendor ID:	0x1a86
Version:	2.52
This is a QinHeng Electronics CH340S USB-Serial chip according to USB ID
Apparently used by a load of cheap Arduino clones, whose driver is no longer bundled in OS X. There is an updated driver. Voila!
Unwitting-Accomplice:~ tobyz$ ls /dev/ | grep -i usb
cu.wchusbserialfa140
tty.wchusbserialfa140
Next: HPGL. Surely there is a command-line SVG to HPGL converter, but I didn’t find it in a few minutes. Let’s use Inkscape. I use homebrew but after 24 minutes of building, the HPGL export didn’t work because of a missing python package. So let’s just use Inkscape on the Linux laptop.
cat foo.hpgl > /dev/tty.wchusbserialfd130
It cuts! It cuts the right shape! It cuts a 500mm shape to be 9mm. Bugger. To be continued, tomorrow.
Update for 6/2018
Rather than download a driver from a site that only seems to be tangentially related I’ve found a rather more documented driver here which states it does not crash 10.12 (and hopefully 10.13) here is one on github, also with uninstallation instructions.
I’ve discovered this utility (HPGL Distiller) which can help formatting for the vinyl cutter. The connected command line utility can convert from svg or pdf to the HP format that the plotter needs and the distiller removes useless commands like width and colour, magic!
Settings Notes
Make notes of settings that worked with the vinyl cutter here!
- 90g with the red roll of vinyl did not cut through the backing paper- need to add in the material thickness - more tests needed