I’m coming along, and so is @Esther_Gladstone I think 
1 Like
I’m planning to be there from 7pm 
1 Like
I’ll be there
1 Like
After a bit of playing around (yes I’m a project manager in real life) I was running a trello board in the background to organize the group build but trello is too simplistic to my taste. I’ve found that from the free options available clickup.com is pretty nice and contains the type of granularity that I’m comfortable with.
I’m currently migrating the tasks to this tools and it’s completely up to you if you want to have access to the board and see the organization behind the build. Dermot you should have received an invite already.
If you are interested send me your email as a PM and I’ll invite you.
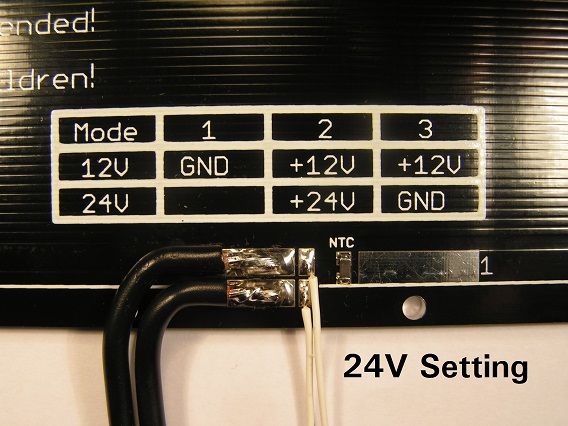
Tomorrow bonus brain teaser: We bought dual power heatbed that are usually a breeze to wire however this one had me wonder what they mean when they says
- 12 V: one line thread cross 1, another cross 2, 3
- 24 V: one line thread cross 2, another cross 3 (1 don’t need to pick up).
So the solution is somehow simple based on the info from that page we should only need to measure the resistance on the pad to find out where we need to solder the wires.
Resistance between 1.4 and 1.6 ohm for the 12V
Resistance between 5.0 and 5.4 ohm for the 24V
I’ve only glanced…but I think it’s telling you to add resistors? Or are they already SMDd on? Happy to enjoy working this out tomorrow night
No need to add resistors i think but need to add a thermistor (smt) but that’s just for the temp sensing and is not related to heating up. Re the wiring - drew a sketch - it is quite clever the way it’s wired that 12 and 24v give same power. Basically 3 pads, so three potential “pairs” of pads. Measure the resistance between each pair of pads (you should get one pair that has about 5 ohm resistance and the other two pairs should have about 2.5-3ohm ish). Note which pad combos make the 2.5 ohm connect (e.g lets say pad 1-3 gives 5ohm and 2-3 and 1-3 each give 2.5).
The two pairs with 2.5ohm resistance will share a pad in common (in our case, its pad 3).
So connect pad 3 to positive and then connect pads 1+2 together and then to ground.
Maybe This sketch illustrates it a bit -

(The resistors in my sketch are actually the resistance of the pcb traces which acts as the heatbed)
2 Likes
From the reprap wiki:
12V

24V
In images shown pads are numbered. If that is not the case for our printbeds we can measure resistance to work out pairs as suggested by Calum. Maybe measure resistance anyway just to make sure theory is backed up by practice
PS @laurent_muchacho have we got thermistors?
I’ll head down there in a bit
Sorry guys: I’m not going to make it down tonight…work’s got in the way


From this evening’s session:
Clean room in full swing


Marlin firmware successfully flashed


Ramps 1.4 shield

Assembled power supply


LCD enclosure

Present were @laurent_muchacho @Esther_Gladstone @peter_hellyer @mikekelly @dsikar
3 Likes
It was really good to see you last night. We’ve made good progress and we are getting those tedious task out of the way.
Slowly now it’s going to be more and more valuable for everyone to attend the prep session e.g. next week hotend assembly is a key step in the assembly of your printer understanding what we are going to do is primordial to future successful maintenance procedure.
Special note to @Vagwin as you’ve opted out of the PSU options I need to make sure you have a suitable and safe PSU to use and we need to do a bit of planning about wiring etc
So big shout out to everyone on the build if you can join.
FYI:
@dsikar
@dermot
@Esther_Gladstone
@peter_hellyer
@mikekelly
@Calum_Nicoll
@Vagwin
@david
1 Like
Just a quick FYI to anyone coming tomorrow. I will try to be there early (hopefully around 6) so I can start to organize tasks
- We’ll look more onto the mk2 heatbed wiring
- Start to assemble the Hotend
– Wire extension for the cooling print fan
– Hot assembly of the nozzle/heatblock - Bring a laptop if you have one this will help to control the electronic
– Install Arduino IDE
– Install Pronterface
I look forward to see you and in the mean time have a great day
FYI please participate to build and preparation or at least reply to the thread:
@dsikar
@dermot
@Esther_Gladstone
@peter_hellyer
@mikekelly
@Calum_Nicoll
@Vagwin
@david
I’ve got Lucas’ birthday celebrations on Tuesday, so unlikely I’ll be able to make it…will overcompensate in some other way/time
1 Like
I’m aiming to get there for 8pm
1 Like
I shall be there tomorrow, as I am way overdue!
I will bring my PSU for assessment along with laptop to do arduino bits.
I will try to see where I am with my predicament re: printed parts and frame. 
See you all tomorrow!
1 Like
Will absolutely try to attend barring any enigma related hiccups. Thanks for all your hard work on this laurent, its really appreciated.
1 Like
@Esther_Gladstone and I will very likely be along too
1 Like
Hopefully I should make it too, maybe at 8ish
1 Like