Use this guide to get ready for:
- L1 Induction – Spindle Turning
- Sharpening Assessment – Wheel Sharpening
- L2 Induction – Faceplate Turning
It covers safety practices, mounting methods, tool use, techniques, and understanding different types of wood.
Learning Resources
Recommended Book
A copy of Woodturning: A Foundation Course by Keith Rowley is available in the lathe area. It’s an excellent reference for techniques, tool use, and safe practice. Review the laws of turning
Learning projects
Are you looking to sharpen your skills and give back to the space?
Woodturning project request:
@textilestechs need wood burnishers you can find an example in the draws in the textile area
@metaltechs need wooden file Handle / rasp handle
Lathe Specifications
Lathes Specifications
New lathe: Laguna Revo 24/36
Old lathe: TYME AVON Lathe Info
| Spec | Laguna Revo | TYME AVON Lathe |
|---|---|---|
| Headstock Thread | 33mm | 25mm |
| Motor HP | 3 | ¾ |
| Speeds RPM | Variable 350-3000 | 470, 750, 1150, 2000 |
| Max Diameter (over bed) | 609mm | 275mm |
| Max Diameter (over rest) | 501mm | 200mm |
| Max Length (between centres) | 914mm | 580mm |
Safety & Treatment Tips
Personal Protective Equipment (PPE)
- Eye protection (compulsory)
- Face shield (recommended)
- Dust mask (especially when sanding)
- Closed-toe footwear
Before Turning
- Tie back long hair; remove jewellery, scarves, gloves
- Inspect lathe and tools for damage
- Check wood blank: seasoned, no cracks/knots/metal, within size limits
- Mount workpiece securely
- Set appropriate speed
- Clear area of slip or trip hazards
During Turning
- Use dust extraction system
- Stand aside when starting the lathe
- Hold tools firmly, contact tool rest
- Never reach over spinning work
- Never adjust tool rest while spinning
- Use scrapers in trailing mode only
- Stop if anything sounds or feels wrong
- Keep hands/fingers away from moving parts
- Use sharp tools to reduce friction and prevent fumes
Sanding & Finishing
- Always wear a respirator when sanding
- Sand below the workpiece (approximately 300–500 RPM)
- Use light pressure, avoid heat build-up
- Progress: 120 → 150 → 180 → 220 → 320 → 400 grit
- Choose suitable finishes: friction polish, oils, lacquers
After Turning
- Turn off lathe
- Clean lathe, tools and area
- Brush down bed
- Return tools to storage
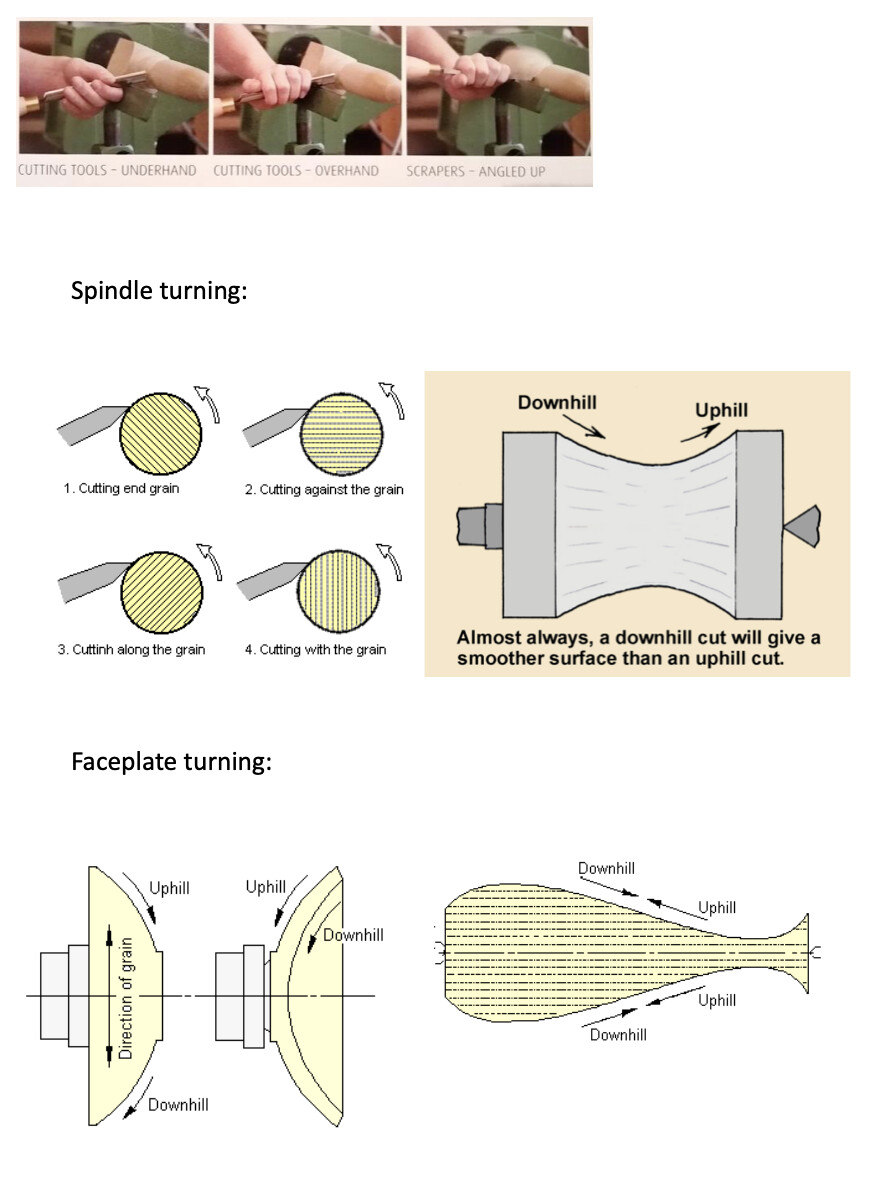
Level 1 – Spindle Turning
Spindle turning mounts the blank between centres. The grain runs parallel to the bed.
Used For:
- Table legs
- Spindles
- Tool handles
L1 Requirements
- Review this part of the guide
- Score 100% in the L1 Quiz
Know Your Lathe
| Part | Function |
|---|---|
| Headstock | Drives the spindle |
| Spindle | Holds chucks or drive centres |
| Tailstock | Supports work at opposite end |
| Tool Rest | Supports tools during cuts |
| Lathe Bed | Guides movable parts |
| Banjo | Base for tool rest |
| Motor & Control | Controls lathe speed |
Speed Guide
| Task | RPM |
|---|---|
| Roughing | 90-450 |
| Between Centres | 750–3000 |
| Faceplate | 250–1150 |
| Sanding | 300–500 |
| Finishing | 300–500 |
Tools Approved at L1
| Tool | Use | Hold |
|---|---|---|
| Square Carbide | Flattening | Flat, horizontal/low |
| Round Carbide | Curves | Handle slightly low |
| Diamond Carbide | Details | Flat or lightly angled |
| Roughing Gouge | Square to round | Flute up, tool low |
Restricted (until sharpening assessment): parting tool, skew chisel, spindle/bowl gouges
Approved Woods
Beginner-Friendly
| Wood | Traits |
|---|---|
| Maple | Smooth, clean cuts |
| Cherry | Darkens nicely, stable |
| Walnut | Dense, elegant finish |
| Ash | Open grain, easy turning |
| Sycamore | Soft and stable |
More Challenging
| Wood | Notes |
|---|---|
| Oak | Tends to tear, use sanding sealer |
| Beech | Warps when wet, turns cleanly |
| Birch | Dries fast, seal to avoid cracks |
Avoid blanks with end-grain checks or insect damage.
Hazardous Woods (Toxic or Allergenic)
| Wood | Hazard | Protection |
|---|---|---|
| Black Locust | Toxic dust | Full PPE |
| Yew | All parts toxic | Gloves + respirator |
| Iroko | Skin/eye irritant | Gloves, extraction |
| Padauk | Stains, dust irritant | Extraction + cleanup |
| Purpleheart | Fumes | Sharp tools, avoid friction |
| Cocobolo | Allergen | Respirator, caution |
| Ebony | Lung irritant | Wet sand with oil |
Wheel Sharpening
After 3+ hours of turning:
- Review Tormek Tool Page
- Watch video Sharpening Woodturning Tools on Tormek
- Complete the sharpening assessment (100% required)
- Message @woodlathetechs for approval
Unlocked tools after approval:
- Parting tools
- Skew chisels
- Spindle gouges
- Bowl gouges
Level 2 – Faceplate Turning
Faceplate turning mounts the blank on the headstock only, with grain perpendicular to the bed.
L2 Requirements
- 5+ hours turning
- Tormek sharpening assessment complete
- Comfortable with carbide + HSS tools
- Score 100% in the L2 Quiz
Applications:
- Bowls, platters, hollow forms, vases
Tools
- Bowl gouge
- Scraper
- Parting tool
Safety Recap (L2)
- Wear face shield, tie back hair, remove jewellery
- Set correct speed (e.g. 10" bowl: 600–900 RPM)
- Use green wood only if structurally stable
- Clean tools after use
Mounting the Workpiece
a. Faceplate Mounting (First Phase)
- Screw faceplate flush into blank
- Centre carefully and spin-test by hand
- Use tailstock for initial support
b. Chuck Mounting (Second Phase)
- Reverse bowl after tenon/recess is cut
- Mount tenon or recess in scroll chuck
- Ensure tenon has parallel sides and a flat shoulder
- Do not overtighten – avoid damage
- Spin slowly to confirm it runs true
Tool Use & Bevel Riding
- Bowl gouge: anchor > bevel > cut
- Riding the bevel reduces chatter and allows for smooth, controlled cuts
- Cut outside: centre to rim
- Hollow inside: rim to bottom
- Flute between 10 and 2 o’clock
Workflow Summary
- Prepare blank, draw circle, and cut round on bandsaw/jigsaw
- Mount on faceplate, rough external shape
- Form tenon, reverse into chuck
- Hollow interior using appropriate gouge techniques
- Sand in stages and apply finish
Wall Thickness
- Aim for 6–10 mm uniform thickness
- Use calipers or fingers to assess
- Leave base slightly thicker for green wood
Finishing
- Sand: 120 to 400 grit progressively
- Apply finish (e.g. oil, wax) at low speed
Practice
- Start with simple forms
- Expect catches and minor mistakes
- Focus on tool control and bevel riding
- Share your work with@woodlathetech or members.
One of the best ways to grow your skills is by getting involved and helping to run the space. It’s a rewarding way to deepen your practice and support the community. Find out more about how you can help here:
Woodturning – We Need Inductors and Techs
Image references