
I definitely second this!
Newbie Maker Projects Diary
I’m sure there used to be some in the space. Almost certainly belonged to a member though.
I’m really pleased with all the ideas and encouraging feedback this little project is accruing! I’ve decided I won’t be afraid to make mistakes and just go for it. Inexpensive wood is probably a good idea for a first shot, and if I ruin it - I ruin it 
Only thing holding me back now is the machinery inductions! I realise the run-up to christmas is always crazy busy, so I’m poised to spring on any induction opportunities that surface 
2 Likes
you can go a step further chisel in a small channel too, making a half-v shape on the waste side. This helps guide a straight-back saw precisely where it needs to go. Check out paul seller’s youtube channel, he has a few videos where he does this
1 Like
Taking everyone’s kind advice into account, I’ve updated my design to make it look a little more interesting while still being relatively sturdy and easy to make. The base is now 10mm tall with a 5mm deep rebate along the upper edges, making a 10mm wide channel for the wall pieces to sit in. The mitre angles are 45° now which I assume should be a little easier to cut accurately than 22.5°…?
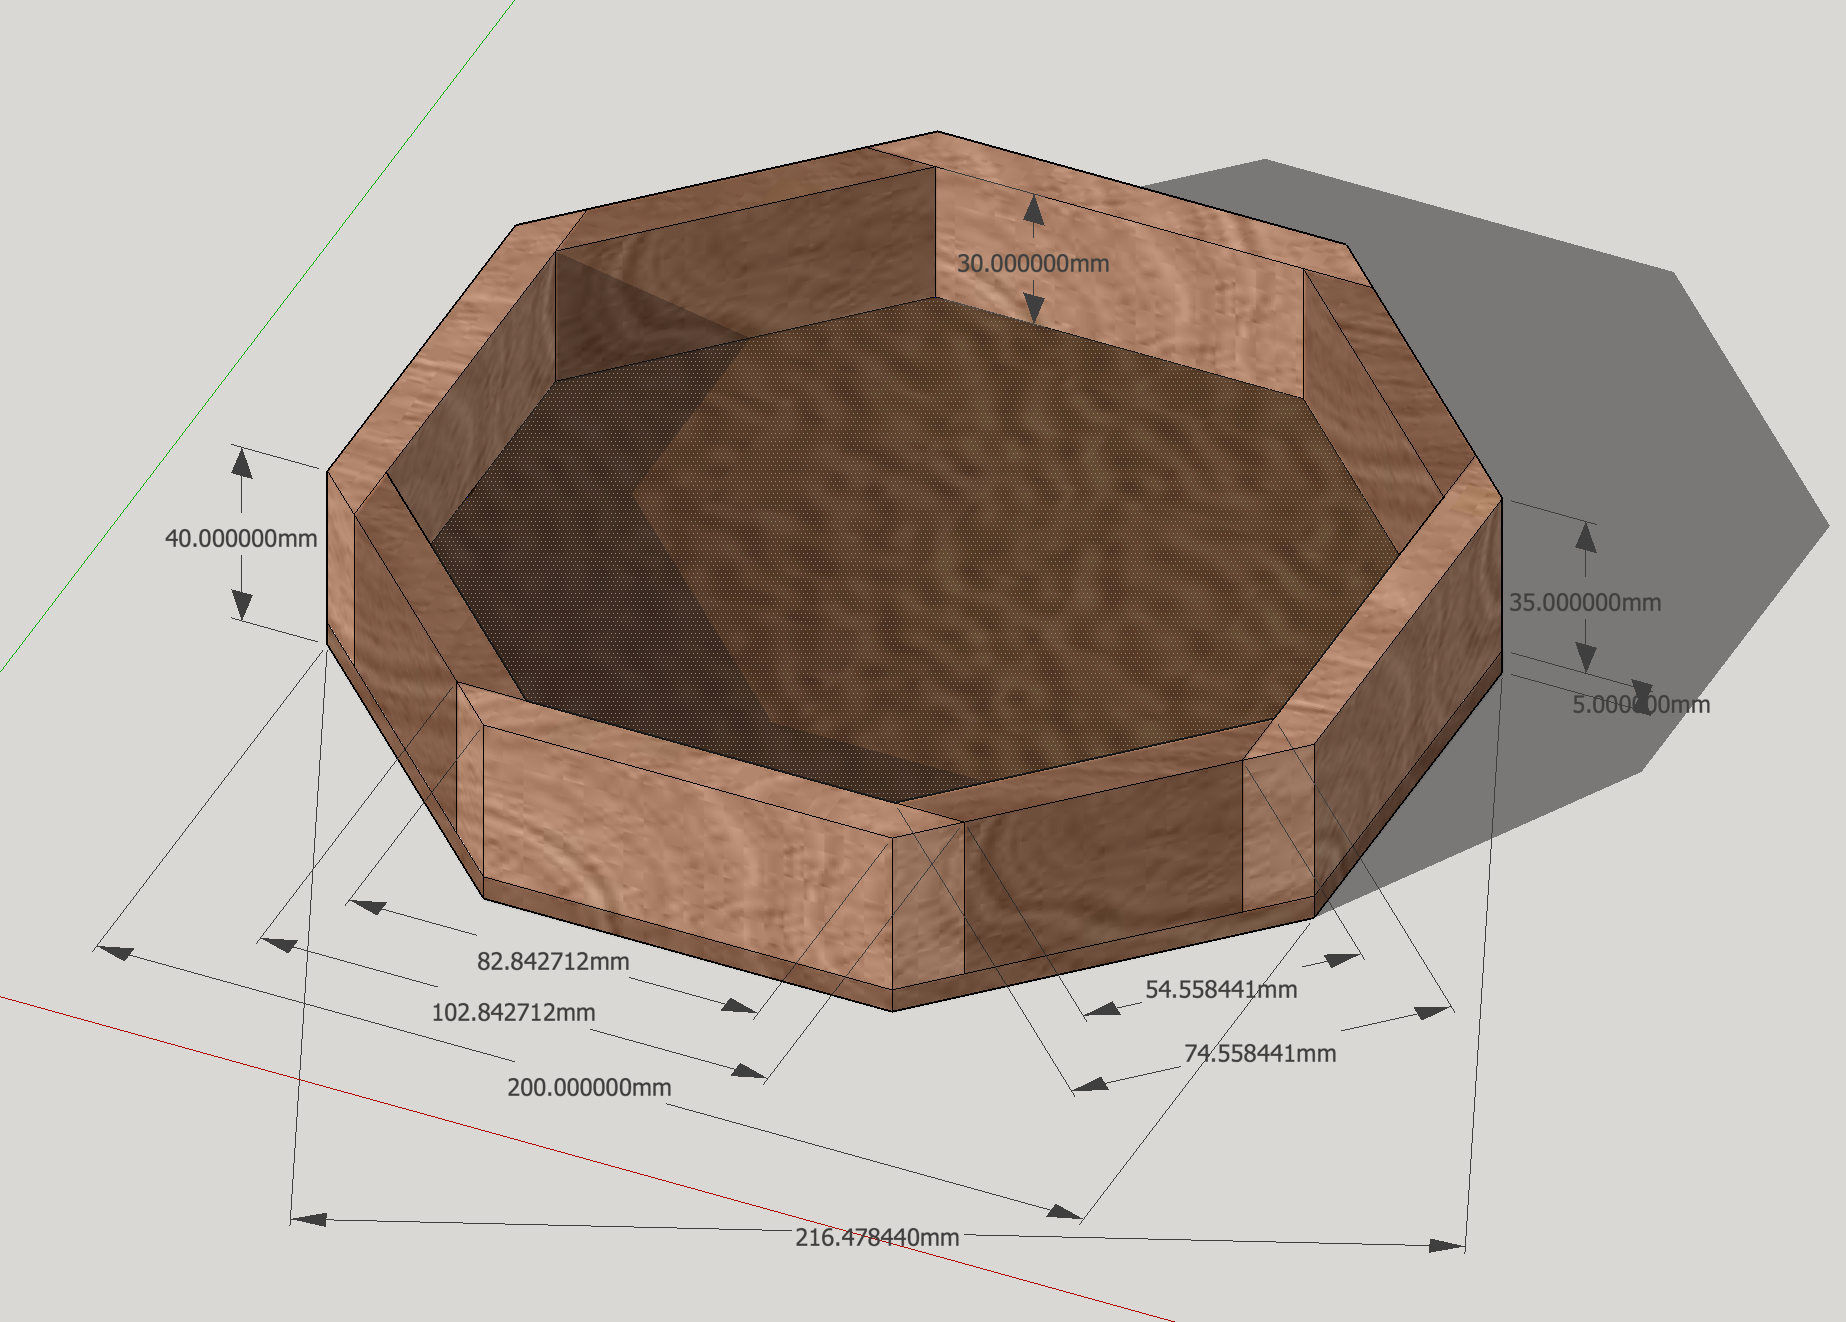
I also figured out how to make a perfect octagon in SketchUp, so I now have precisely accurate measurements. Woo!  It seems like warping is an issue several people have mentioned. Can anyone tell me how to minimise or avoid it if I want to use 10mm board or boards for the base?
I’m raring to go, so now I just need to get inducted on the wood machines! It seems like they don’t happen all that often and places fill up quick, so I’m ready to pounce… Is there any kind of long term waiting list, or is it just luck of the draw?
You can’t really avoid having the wood do what it wants to do. Some woods are more stable than others.
A big board will expand or contract mostly in the cross grain direction. To counter this you usually have the panel floating in a slightly deeper, routed slot, and left unglued (the frame you don’t have to worry about moving so much as the distances are too short). The panel can move about inside the frame depending on the season, but won’t feel loose to the touch.
This means that unlike your latest drawing the structural integrity will mostly be down to the frame and not the board so you might need to join the corners properly with something like splines or a more elaborate joint. The good thing with splines is you can just glue the frame together and put them in afterwards.
Getting a 22.5° angle is as easy as any other angle, the trick is to draw out the correct angle very big on something, using trig (so many cm in X, so many in Y = your angle) The bigger you draw it, the lower the margin of error. You could also just print an A4 template from a computer if you make the lines thin enough. You then have a guideline to measure against with a sliding bevel (for marking and cutting by hand) or the mitre saw fence (saw a scrap offcut of mdf much wider than your frame at increasing angles until it lines up perfectly when put on top of your guide drawing. Over the smaller distance of your frame pieces’ edges the error margin will thus be reduced down to practically nothing and your angle will be perfect. Its important to get it right or it won’t make a proper octagon. Or you will get horrid gaps.
If you are going the full hand-tool route you will need to make a template for getting 45° on your bevel tool anyway so changing the angle won’t really save you a step. I think the mitre saw might have a locking pin at 45 though, not sure. I wouldn’t trust the intermediate markings that come with the saw though, they might not be accurate enough.
You’ll need to make a fairly thick octagonal block as a clamping jig/jeff to glue the bits together and then maybe saw the splines into the corners for extra strength if you decide you like the look
2 Likes
Long time no post! Patiently I await my wood shop induction – having missed my first chance when I had to work on the day I was offered a space – but thanks to Laurent_Muchacho I’m now inducted on the Ultimaker 2! I have a kilogram of PLA filament on its way in the post, and a buttload of things on Thingiverse I can’t wait to print 
In the meantime, however, I’m feeling the crafting itch without being able to actually start anything, so planning out yet another project seems to be the best course of action.
I’d like to print - or have printed - a few PDFs in high quality and compile them into a book that I can then bind in synthetic leather, using this instructable by solobo. My questions for you lovely folks are as follows:
-
I think I’ve seen mention of a high quality printer at the space. Is it up and running? Does it need induction? If I pay for ink and materials, is it possible to print a few hundred A4 colour pages? I’d also love to print a map for framing if it does large sizes.
-
Does anyone have experience with simple book bindings like this, and any tips they can share?
-
Is it possible to engrave a relatively simple design onto a sheet of synthetic leather with, say, the laser cutter? I might be completely crazy but I feel like that’s a thing. I’m still halfway down the waiting list for the 'cutter, so I’d like to know if I should wait 'till I’m inducted before I get binding.
Would love to hear your thoughts. Thanks for reading!
hey Dan, here’s my take
-
probably, but inkjet is expensive and not terribly efficient for doing so many pages, you might be better off ordering from a digital offset service if you want anything better than laser prints
-
very small experience but managing the fold width is a bit tricky (there’s software that puts the correct offset on each page). This also means you also need to print your pages oversize then chop them on a guillotine after binding them so the pages are even. We don’t have a guillotine unfortunately
-
engraving veg tan leather works well and shouldn’t be too expensive for a book cover size, you’ll need to check what material the synthetic is made of though. From the looks of it Rexite is the usual synthetic bookbinding material but it looks pretty flammable
1 Like
With book binding, I’m by no means an expert but have some basic knowledge - I don’t know how familiar you are with it the process but you are are probably going to want to put your pages into ‘signatures’ usually 4 to 6 sheets depending on paper quality. You will need to know how many sheets in a signature you will use before you get the pages printed otherwise you will have trouble getting things in the right order.
1 Like
I would personally love to do some bookbinding of some description. Particually making custom notebooks and diaries and stuff 
I’m not great at it by any stretch but if people are up for it I would be happy to organise a session in the space. I have some of the materials.
4 Likes