Newbie Maker Projects Diary

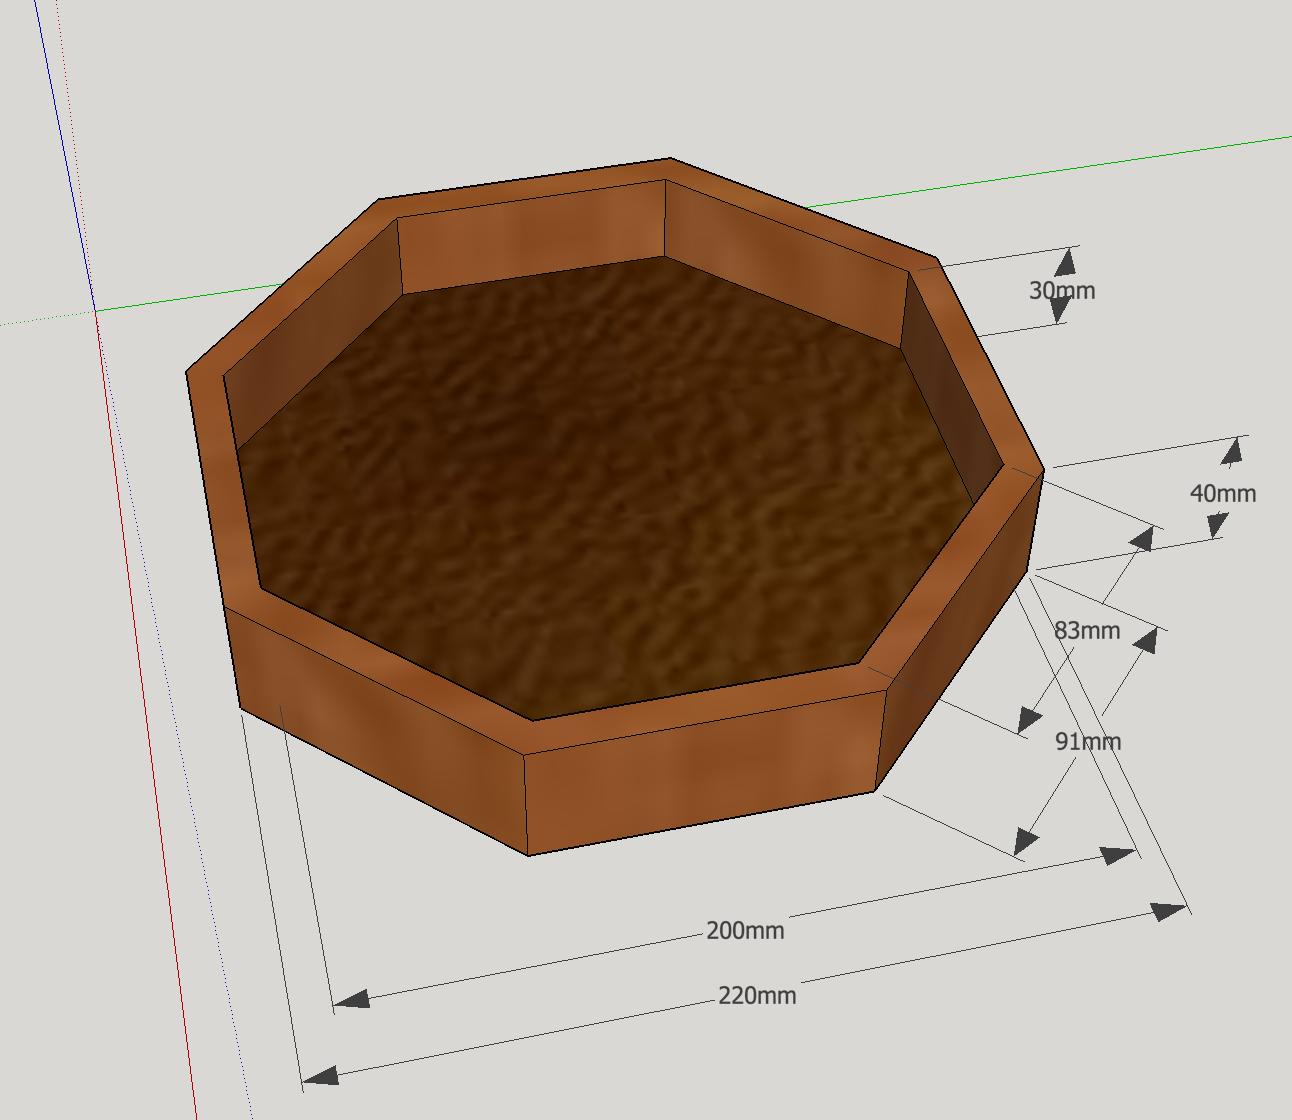
Hi folks! I’m looking forward to meeting a bunch of people and getting inducted with the wood workshop machines at the christmas party on Saturday, as I’m raring to go with this octagonal dice tray. :grin:

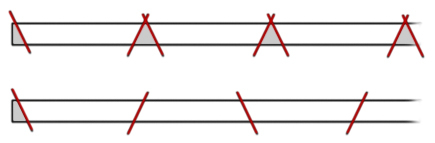
I haven’t built anything since DT at school. I realise this is a pretty simple item, but can anyone recommend a build process? I’d love to use finger joints between the 8 pieces of the rim, but I’d settle for just glued together and/or nailed to the base, if it will be significantly easier for my first try while I learn to use the tools and machines.

I think I’d like to make it from walnut, oil and wax it, and line the inside with synthetic leather. Any tips or comments? How much of what materials will I have to get ahold of myself?

I would personally make a jig (although round makerspace, you’ll hear most jigs refered to as a Jeff, for historical reasons that no-one really remembers) set to the right angle, then carefully cut the mitres with the mitre saw to the right length and work around until you get the ring. Use a stop block on the mitre saw and the correct angle and you’ll have no problems with that though

I’d be tempted to laser cut the base and route a channel around the bottom of your outside wood to set it in as well. Would then line the base before constructing.

2 Likes

Thanks for the tips! Looks like I’ve got some terminology to learn.

I’d love to get working with the laser cutter eventually (whole other set of projects for that one) but for this build I think I want to go full handmade. Guess I’ll google how to make a jig named Jeff :stuck_out_tongue:

I may have a piece of leather that size, I will have a look

1 Like

Also I notice 40mm height and 30mm height, is one total height, and 30mm height of walls? Leaving a 10mm base.

If that is the case what is the thickness of the walls?

Exactly as you say! Walls are also 10mm. Thanks for your interest :grinning:

Glue is best for this kind of project. If you’re looking for somewhere to buy the timber, you can get 10mm walnut lengths at Whitten Timber in Peckham and from Surrey Timber (who also do mail order). I would suggest your base could be 6mm plywood, partly because it’s cheaper than walnut & partly because you won’t get 200mm-wide walnut lengths (so avoids you having to glue them together to make a board. Whitten timber have lots of very cheap plywood offcuts if there aren’t already some in the workshop. The base will be covered anyway with your leather so doesn’t have to look neat. Don’t forget to sand the inside side of the box before you glue it all together - it will be really tricky to do afterwards. A small project like this, though looks simple, is actually quite tricky because there the tolerance for error (eg in the angles) is very small. Attaching the base may be done best by cutting a 6mm groove (called a dado) in each wall on the inside, say 3-4mm deep (I would do it on a table saw, the blades are usually 3mm wide so you would need to make 2 passes for each groove). Then your base would just slot into it. This method has two advantages: the edges of the base don’t need to be neat, as they will be hidden, and (like in your drawing) on the outside you just see the walnut wall. Would suggest trying your oil and wax finish on a small bit of walnut before you go for the whole thing, to check it looks right. When you’ve glued it, you could maybe hold it together firmly with painters’ tape while it dries? Good luck!

2 Likes

Should probably use a router or the spindle moulder to cut the rebate. I’m not sure we should be encouraging the use of the table saw without the riving knife in place.

Also in sure you meant to make it clear that it’s a good idea to cut the groove in the side before you cut it up into 8 pieces.

And maybe veneer keyed joints? Probably doesn’t need them for strength but looks nice.

1 Like

Yes good point about table saw vs router. I meant simply that that’s how I’d do it but it’s not very safe.

The router table will do this easily

Very interesting project…
If you want to do all with hand tools is also a good challenge!
The use of math is essential… you need to know the angle of your miters and find a accurate way to set a jig/jeff to get it spot on.
Also the stop block is a must! Using a tape measure combined with miters can be so frustrating!
For the finger joints I suggest to don’t do it, is REALLY tricky!
I have a couple of tricks to tell you but is difficult to explain in writing! Happy to have a chat about it.

Little extra idea, have you thought about floking the inside instead putting leather?

1 Like

The miters are half of 45° so 22.5° each, we have bevel gauges at the space so you could use those if you want to do it by hand, but you really need to be suuuuuper precise to not get horrid gaps on the corners. No need for a jeff though, our mitre saw pivots and if you cut them by hand you’d rely on knife marks.

For glue-up you could use the base as a guide but you might need a bit of extra support to clamp to. I’d just make a big octagonal block of the right size and put it over the base. Cutting splines in the corners might make a nice feature and make them bind together more strongly too ?

1 Like

Thanks all for the fantastic input :smiley: I’m trying to keep up with the terminology and machinery names (google is my friend) and it’s looking like my plan should be:

  • Cut a 210mm wide hexagonal base from a board or several glued boards.
    –I’d like to use 10mm wood as I want it to have a bit of weight. Doesn’t have to be walnut though.

  • Cut a substantial length of 10x40mm, and cut maybe a 5x10mm rebate along the whole length before separating into pieces with a mitre saw at a 22.5° angle.
    –Would it be easier and waste less wood doing the mitre cuts before the rebate step?

  • Sand the inner sides of the walls, before glueing to the outer edges of the base.
    –I was originally expecting to just put walls flat on top of base, but now I think hiding the base inside the walls would look better!

  • Sand, oil and wax the tray, then line with synthetic leather.
    –I’ve also considered flock and cork, but I think the leather will look classier, and provide a smooth flat surface while muffling the dice rolls a little.

Anyone see any jarring mistakes in my plan? I suppose I misspoke earlier when I said I wanted to do this by hand - what I meant was without anything automated like a laser cutter. Purely by hand could be fun but this is also meant to be practice with some of the machines!

Thanks again and hope to see you guys at the event tonight :smiley:

1 Like

Sounds good. Concerning whether to cut the 22.5 edges before the rebate, I would do the rebate first. Although it could be that running circa 800mm length of 10x40mm walnut through a router table is difficult, so perhaps it would be worth doing it in two shorter lengths, purely to make it easier to keep good control over it? Your plan uses very small amounts of timber, so there’s going to be little waste. I’m sure there are various ways to approach it, but I would cut the walnut into 8 equal lengths, and then separately do the 22.5 degree cuts. It would give you more control at the mitre saw than trying to cut many short lengths from one long strip. For the base, if you decide to make one by gluing together several strips of wood, if you are able to arrange them so that adjacent strips have their grain running in opposite directions, that will offset the bad effects of warping that may otherwise take place over time. In other words, half the strips will warp in one direction, and half in the other, thus cancelling it out. But if you just want weight, maybe mdf is worth considering?

If you need to use filler, get quite a dark one.

1 Like

I’d definitely use a manufactured board for the base. No need to glue anything up and it will more importantly stay stable as moisture levels change, which natural timbers won’t. I don’t think the wood can be seen in your design anyway. You can get plywood faced with hardwood veneers if you really want it to look like real wood.

If you really do want to use real wood then your design needs to take into account the changes in dimension (mostly across the grain) This might be as simple as cutting the rebate slightly larger than the thickness of the wood and then making the base slightly undersized.

1 Like

The overhead gard allows this to be done with them knife in place

I would buy some pine or something cheap and make a practice version in that first, to the exact same dimensions you want to make the final one. Then you can make mistakes on the practice one and figure out the process before you start cutting your nice wood. So any mistakes will just be an interesting learning experience rather than frustrating or disappointing. :slight_smile:

5 Likes

Good advice :slight_smile:

Also, you’d be able to use the pieces as templates for the real thing (assuming you don’t glue it)

1 Like

Although walnut is much harder than pine so it won’t behave exactly the same when you cut it. You notice the difference most with any bits you do with a chisel. But getting the angles and sizes right would still work.

Maybe also allow enough walnut for 10 lengths or so, so if you damage any bits by accident it won’t be a disaster. Although you can often change the design of something a bit to accommodate mistakes. I made a little wall-hung cabinet out of walnut and chipped off a sliver of the edge of one piece by accident. So then I just planed a chamfer all the way round all the edges which ended up looking quite nice.

1 Like

I would do the angled cuts by hand, scoring all the way round first with a marking knife to prevent the surface of the wood from tearing and then cutting with the thinnest sharpest saw you can find. I think the mitre saw might not be precise or neat enough to get this perfect. And they are only small pieces so it’s not a lot of work to do it by hand.

We could really do with some Japanese saws for work like this.

2 Likes