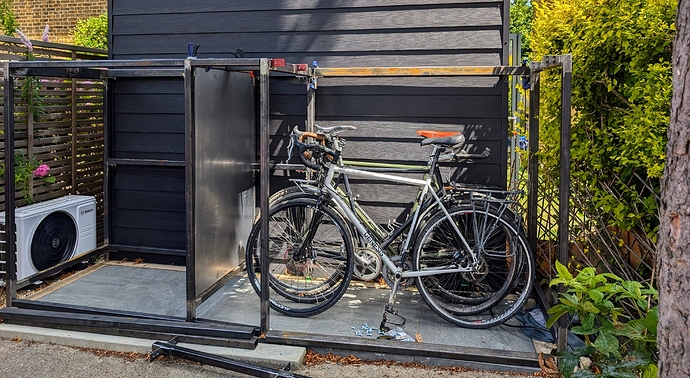
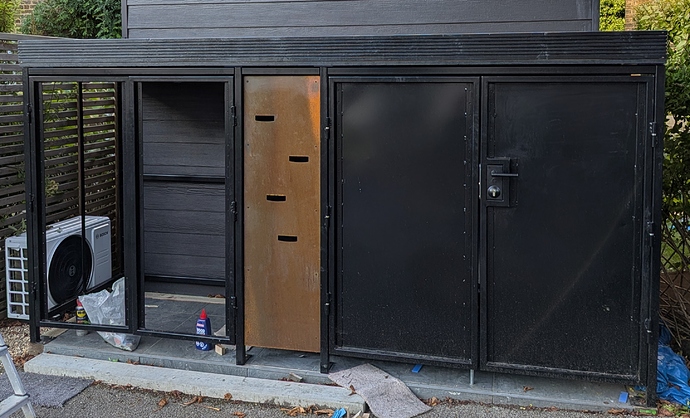
A couple of years ago I built a garden office and left a muddy hole at the side for a future bike shed. The plan was originally to put in one of the Asgard boxes but eventually decided a custom design was going to make better use of the space and provide a bit more utility by hiding two ugly wheelie bins.
Some Sketchup and one ridiculously expensive quote from a local metal fabricator later and I’d decided to sort out a MIG induction at the space and have a go at making it myself. First metalwork project so definitely a challenge, though with a fair bit of general DIY-level experience behind me it felt achievable.
Idea was to squeeze in two wheelie bins on the left and then three or four bikes in a slightly more ‘secure’ area on the right. A mature tree on to the right meant the doors needed to be raised from the floor quite a bit to clear the root-raised pavement. Corten panel in the front middle to provide a bit of rigidity and break up the timber battens a bit (and hide any potential misalignment!).
The whole thing needed to be modular so I could assemble it on site and transport bits to/from the space as needed during the build, so ended up with a fairly basic design that involved four main welded frame pieces to which angle iron ‘brackets’ would be welded and then the crosspieces bolted onto.
I wanted a ~100mm depth green roof on top (~500kg) for some wildflowers and mucked around with ChatGPT as my structural engineer to settle on a mix of (mostly) 40x40 and 60x40 3mm box section for the frames and crosspieces, with 30x30x2.5mm for the door frames. It’s undoubtedly overengineered for the weight but I figured larger steel would also give a bit more room for error on welding quality.
Long story short, much welding, a lot more grinding and a lot more drilling than I’d first anticipated and was relieved to check the bikes actually fitted:
Doors next, quite apprehensive about using weld-on hinges, but turned out to be relatively painless.
Will admit to being pleasantly suprised when I put things together at home for a test fit and they lined up:
Lots more time spent grinding, welding , cutting drilling and whilst I was getting a bit bored of lugging stuff to and from the space I had another set of doors done and things were taking shape fairly well:
Summer holidays intervened for a bit, but eventually was ready to take the whole thing apart for the nth time and get it painted. This wasn’t an especially cheap part of the built but did I want the thing to last so decided on a zinc spray and powdercoat finish. Initially the plan was to hot-dip galvanise but zinc spray seemed a lot less hassle for (apparently?) similar protection.
Medway coatings were the cheapest of two places within Zipvan distance that I got quotes from and were good to deal with - I was happy with the overall finish and shotblasting+powdercoating is thankfully quite forgiving when it comes to novice welds and less than perfect grinding.
Also got the front Corten panel laser cut down in Greenwich at Chop Chop Laser. Was only £50 or so (I provided the corten via Metals4u) - gave me both a perfectly edges to help with alignment of the frame and also some nice cut-outs for some trailing plants to poke through (whenever I get around to printing some pots to hang from the gaps).
Selco’s finest ‘marine’ ply for the roof deck with some wide decking boards as upstands to form a tray for the green roof, EPDM to waterproof that and then some DIY firring strips to give it a very shallow fall to the internal drainpipe and I was quite happy with how it was coming together:
End in sight, on to cladding, which was fun… Toss up between western red cedar (used for the front elevation of the office a coupe of years ago) or thermally modified ayous. Went with the ayous in the hope it’d be slightly harder than cedar and for the sake of trying something new.
(I don’t think it is any harder then cedar in practice (still soft and quite scratch/scrape prone) but definitely much more consistent in appearance, which I personally quite liked for this)
Using my mitre saw and a stop block made cutting 100+ battens fairly quick. Doing a once over with a 2mm roundover bit to take the edge off plus a coat of Owatrol Textrol HES to each was a bit more time consuming process but ultimately worth it for the end result (ignore the orange bucket - still need to sort out drainage!):
Took a good few months but I’m happy with the end result and the fact that I can now just about pull off a decent MIG weld most of the time. Couldn’t have done without the space and thanks to Roman and everyone else who’s put a bunch of effort into making the metal area what it is.
Bunch of mistakes were made, thankfully managed to sort out or hide most. Most annoying one is the misalignment of the hinge positions between left and right doors though - utterly stupid lesson in why I shouldn’t trust my memory and should have actually checked the drawings before getting trigger happy with the MIG welder.


 looks amazing, well done.
 I did wonder if someone would point that out…