
This page is referenced by the Basic Wood Workshop (L1) induction
Safety References:
Safety and Health at the Wood Workshop via the International Labour Organisation:
Health and Safety in the Woodworking Industry
This induction process will show you how to use tools correctly and safely
We aim to follow as many H&S laws and best practices as we an. If you are being wilfully negligent and cause damage or injury, you could be committing a crime; equally, if you get injured you are not covered by any MakerSpace insurance.
-
Never use a tool you have not been inducted on
-
Ask for a reminder from a woodtech or experienced user if you are unsure about the tool you’re using
-
In an emergency, dial 999, ask for an ambulance, and give the Makerspace full address:
Arch 1129, 41 Norwood Road
London. SE24 9AJ -
REMEMBER IN AN EMERGENCY
- Shout for help.
- Get the casualty sat on the floor as fast as possible.
- Compression - press cleanest material to hand onto a wound
- Don’t remove anything lodged in a wound. Pack clean material around it.
- Raise the wound above the head and heart.
Where to find information
Has it been a while since you were inducted? Forget a wood shop rule?
DO NOT just wing it! There is a ton of useful information recorded on Discord on the tool pages. This page is a good reference, and all tool pages are found here. Our goal is to have QR codes posted around the space near tools that link directly to the tool pages.
Also, please feel comfortable to reach out to other members with questions, whether that’s in the physical space, or as a discussion post on Discourse. Good tags to reference are @woodtechs, @Wood-inductors, or @woodworkers .
No Lone Working With Power Tools
- Only hand tools may be used when you are alone in the Makerspace (across both arches)
- No-one is permitted to use the pillar drill, electric hand plane or mitre saw when they’re alone in the space - this is in case you injure yourself, and no one is around to help. You can be the only person in the workshop, but someone else must be inside the Makerspace arch at all times. The other person doesn’t need to be a member - so you can bring a friend to keep an eye on you!
- If you’re lone working in the woodshop, you must ask that if the last person leaves Arch1, they let you know.
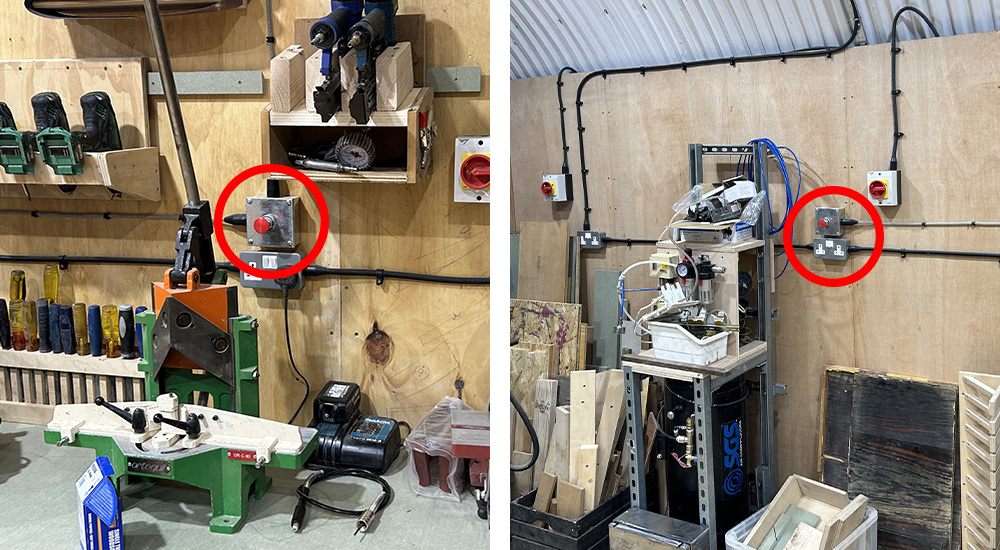
Turning on the Woodshop

Turning on the Woodshop power circuits is done by touching your key fob onto tool control located between the sink and WC. Once this is done, follow the below procedure (using the buttons shown in oval 2.) to run a circuit safety check and turn all power on.
- When you touch your key fob, the top red light will illuminate.
- Press the red button in (it won’t provide any visible feedback)
- Once this is done, push the black button in and the woodshop will power on.
- Anytime the emergency stop buttons are pushed, the above sequence will need to be run.
Air filter
- If the power is on, you should hear the extraction system working - if not, tell the woodtechs. The power for the extraction system is on the wall of the Table saw. This must NOT be turned off.
The workshop has seven emergency power buttons
- Not just for emergency use - last person to leave, must push in any stop before leaving the space!
- Push in any of them to kill all power except the lights
- Make sure the Emergency Stops are ONLY used for emergencies as they’ll cut power to every tool in the woodshop, which could interfere with another members current task. (e.g someone cutting on the tablesaw shouldn’t have the blade stopped mid cut, unless it’s an emergency).
- If you see anyone doing/about to do something dangerous, then hit a switch to kill the power.
- NEVER approach/touch/shout at someone who is already midway through a power-tool cut - it’s safer to kill the power then talk to them.
Along the Right Wall
Along the Back Wall

Along the Left Wall

At the Lathe

First Aid Kits

- There is a first aid kit on the Wall above the sink
- If you’ve used anything, flag it with [someone] and make sure it gets replenished.
- If you have an injury that requires continued pressure to stop the bleeding, it must be noted in the incident book (found behind the sink in Arch 1. You are legally obligated to report any such injuries in this book.
Keep it under wraps
- Make sure any loose clothing, hair, jewellery is removed, tied back or covered. It can get caught in machines very quickly and pull you in!
Be clean and tidy
- Always aim to leave the space cleaner than you found it!
- Make sure the space is clean before you start, and after you finish - if someone leaves the space a state, and you don’t want to talk to them about it - inform the woodtechs
- There are brushes and pans that can be used to clear large areas of dust
- We have Trend and Festool Class-M extractors, both of which have tool take-off and should always be used with powertools (more on that later).
- For general cleanup, the Trend Vacuum is best suited for general cleaning as it has a variety of attachments, including a standard brush head (as shown above). It is your responsibility to check if the bag is full, and if it is, it’ll need to be emptied. Using the machine without cleaning it will damage the motor and provide inadequate cleaning.
- Remember, we have a large space, it’s easier to collect dust at source than clean up the entire area.
- Clean up during working as you go to minimise sawdust and “messy” working
- There are normal bins for sawdust, other rubbish and waste.
- Use the air compressor to help tidy up after dusty jobs. Safe usage is covered in part 3 - hand-held power tools.

Bench etiquette

The workbench and its well
-
The workbench has a “well” - the wide turquoise channel running down the middle. This is to make it hard for things to roll or drop off the bench:
-
Always put tools and loose bits and pieces in the well!
-
Give yourself enough space for the job, but don’t hog every surface to the detriment of other members. Do one thing at a time, or if you really need a lot of room - come during quieter hours, or ask on Discourse if people are planning to use the workshop at a particular time
Securing your workpiece
You should hand-held tools on a piece of wood only if they are securely held in place by one of the following methods:
-
Held onto a bench by the pressure of your weight and a bench-stop
-
Held in a bench vice
Remember you can put the end of a bench-hook in the vice! -
Securely clamped to workbench
-
Bench hooks


- Good for holding a small piece of wood you need to cut with a saw.
- The bench-hook is (eventually) disposable - it can be “sacrificial” - it doesn’t matter if you cut into.
- Never be cutting into the workbench itself!
- Bench vice
- When turning the handle, remember - leftie-loosy, righty-tighty!
- Push the small metal lever towards the centre of the vice to allow you to slide the vice in and out
- Don’t over-tighten or under-tighten - your piece should be held firmly enough that you can’t wiggle it free when pulling hard
- Consider putting a piece of scrap wood in the empty space - then put the put the piece you are working with on top of that before tightening the vice. If there is space between your piece and the rails supporting the vice, then it could slip downwards if you are applying pressure.
- Clamps

-
Types of clamps:
-
“Sliding” plastic jawed ones are quicker and easier to attach and release, and won’t mark your wood - but they aren’t that strong.
-
Metal “C-clamps” are very strong, but take longer to tighten and release by twisting - and they will mark the surface of your wood. To avoid this use sacrificial offcut between the ends of the C-clamp.
Don’t over-tighten - you can always add more clamps.
It’s often easier to have C-clamp screw thread pointing up, rather than down, so you can see what you’re doing when tightening! -
Near each bench vice is a wooden bar which can be tapped up from underneath using a wooden mallet - this pushes the other end of the bar above the workbench surface, which can be useful as a way to stop materials sliding off the workbench when planing!
PPE - Personal Protection Equipment

We have a selection of eye protection and ear defenders located in the wall unit as your enter the space. These must be used as outlined below.
Eyes
- Plastic goggles and glasses hang on a bar as you enter the Woodshop.
- You should wear these when using any powered tool, with the possible exception of the sanders and hand planer.
- You can wear them any time you want to!
- There is a full face shield by the lathe if required.
Ears
- Ear defenders live next to the main door
- Wear ear defenders any time the noise is painful to you, or when you know you will be making a loud noise for an extended period - eg. electric planing, jigsaw, any of the larger power tools.
- Don’t use where you do not need them though - you want to be able to hear what’s going on around you.
- Remember that hearing damage is cumulative
- If you have ringing ears/tinnitus after working in the workshop, then you needed ear defenders
- If the tool is making more noise than you expected - or a noise that sounds unpleasant rather than loud - maybe you’re using it wrong or it’s broken. Stop and ask for advice.
Breathing
- DO NOT share masks
- We suggest every member purchases a good quality FFP3 mask that is equipped with a HEPA filter. This is an essential part of woodworking and is there to protect your lungs from micro-particles, poisonous woods and Allergens.
- Disposable masks can be found in the red metal drawer unit under the mitre saw at the far end of the workshop
- Masks should be worn when doing any quantity of sanding, or work that generate a lot of fine particles - especially with hardwood or MDF, as these can be toxic. Ask for advice if unsure.
Toes
- Try not to drop things!
- Don’t be a hero/martyr - if you drop something heavy or sharp, it’s better the tool get damaged than you - don’t try to catch with a foot.
- Wear sensible, comfortable shoes that cover the whole foot - no sandals or heels! Steel toe-caps are ideal.
Fingers
- Gloves are a BAD thing in the wood workshop. The only exception to the rule is thin latex gloves which you might want to wear when you are applying glue / finishes or handling wood that irritates your skin.
- Gloves reduce your sensitivity to the material you are holding, and could get caught in a tool, dragging your hand into danger
- Consider barrier cream, and plasters on any cuts.
Storing Projects
-
We welcome you to store your projects at the space while they are actively being worked on, but require that projects are tagged and stored out of the way.
-
The current wood shop storage policy can be found in this thread.
-
Project tags are located in the PPE cabinet:
Remember - if your project is damaged/thrown away/re-purposed because you didn’t label it or return it promptly - then that’s your fault! -
Equally - seen a nice bit of wood in the space that you’d like to use? Wondering if you can use it?

- Check if it has any labels on it
- Check if anyone has written their name on the wood in pencil
- Post a photo on Discourse and ask if it’s fair game
Stop - it’s glue drying time! (by MC Claw-hammer)
- If you need to leave something to dry at the Space make sure you label your piece with your name and the “expiry time” after which your piece will be dry - then other members will know when it’s safe to retrieve clamps they might need.
- Use the big white plastic sheets located behind the green drum sander to protect the bench you’re doing the glue-up or finishing work on clean.
- Make sure it is not a hazard or in the way.
- You should notify #admin:storage-requests if it’s particularly large.
- Make sure you can get back to your piece at the expiry time.
- If your project needs to be left in the space whilst you aren’t working on it - remember you need to ask permission on Discourse BEFORE bringing you materials on site.
Applying finishes
We allow oils and varnishes to be used in the woodshop, but there are precautions that need to be taken during and after use:
- Oils and varnishes can make the floor slippery if spilled or splashed around the workpiece. When applying finish, make sure you have some newspaper or an old piece of material to catch any spills or drips.
- If applying an oil based finish with a cloth, it’s vitally important to allow the oil soaked rag to dry out completely before discarding it. We recommend hanging the cloth away from surfaces to allow it to air-dry naturally or placing it flat on a non combustible surface, preferably outside.
- If you’re applying more than 1 coat of finish, we suggest bringing along a ziplock bag to keep your cloths from oxidising between coats.
- NEVER thrown an oil soaked rag into the trash can as it can ignite after several hours of inactivity and cause irreparable damage to the makerspace.