
Notice
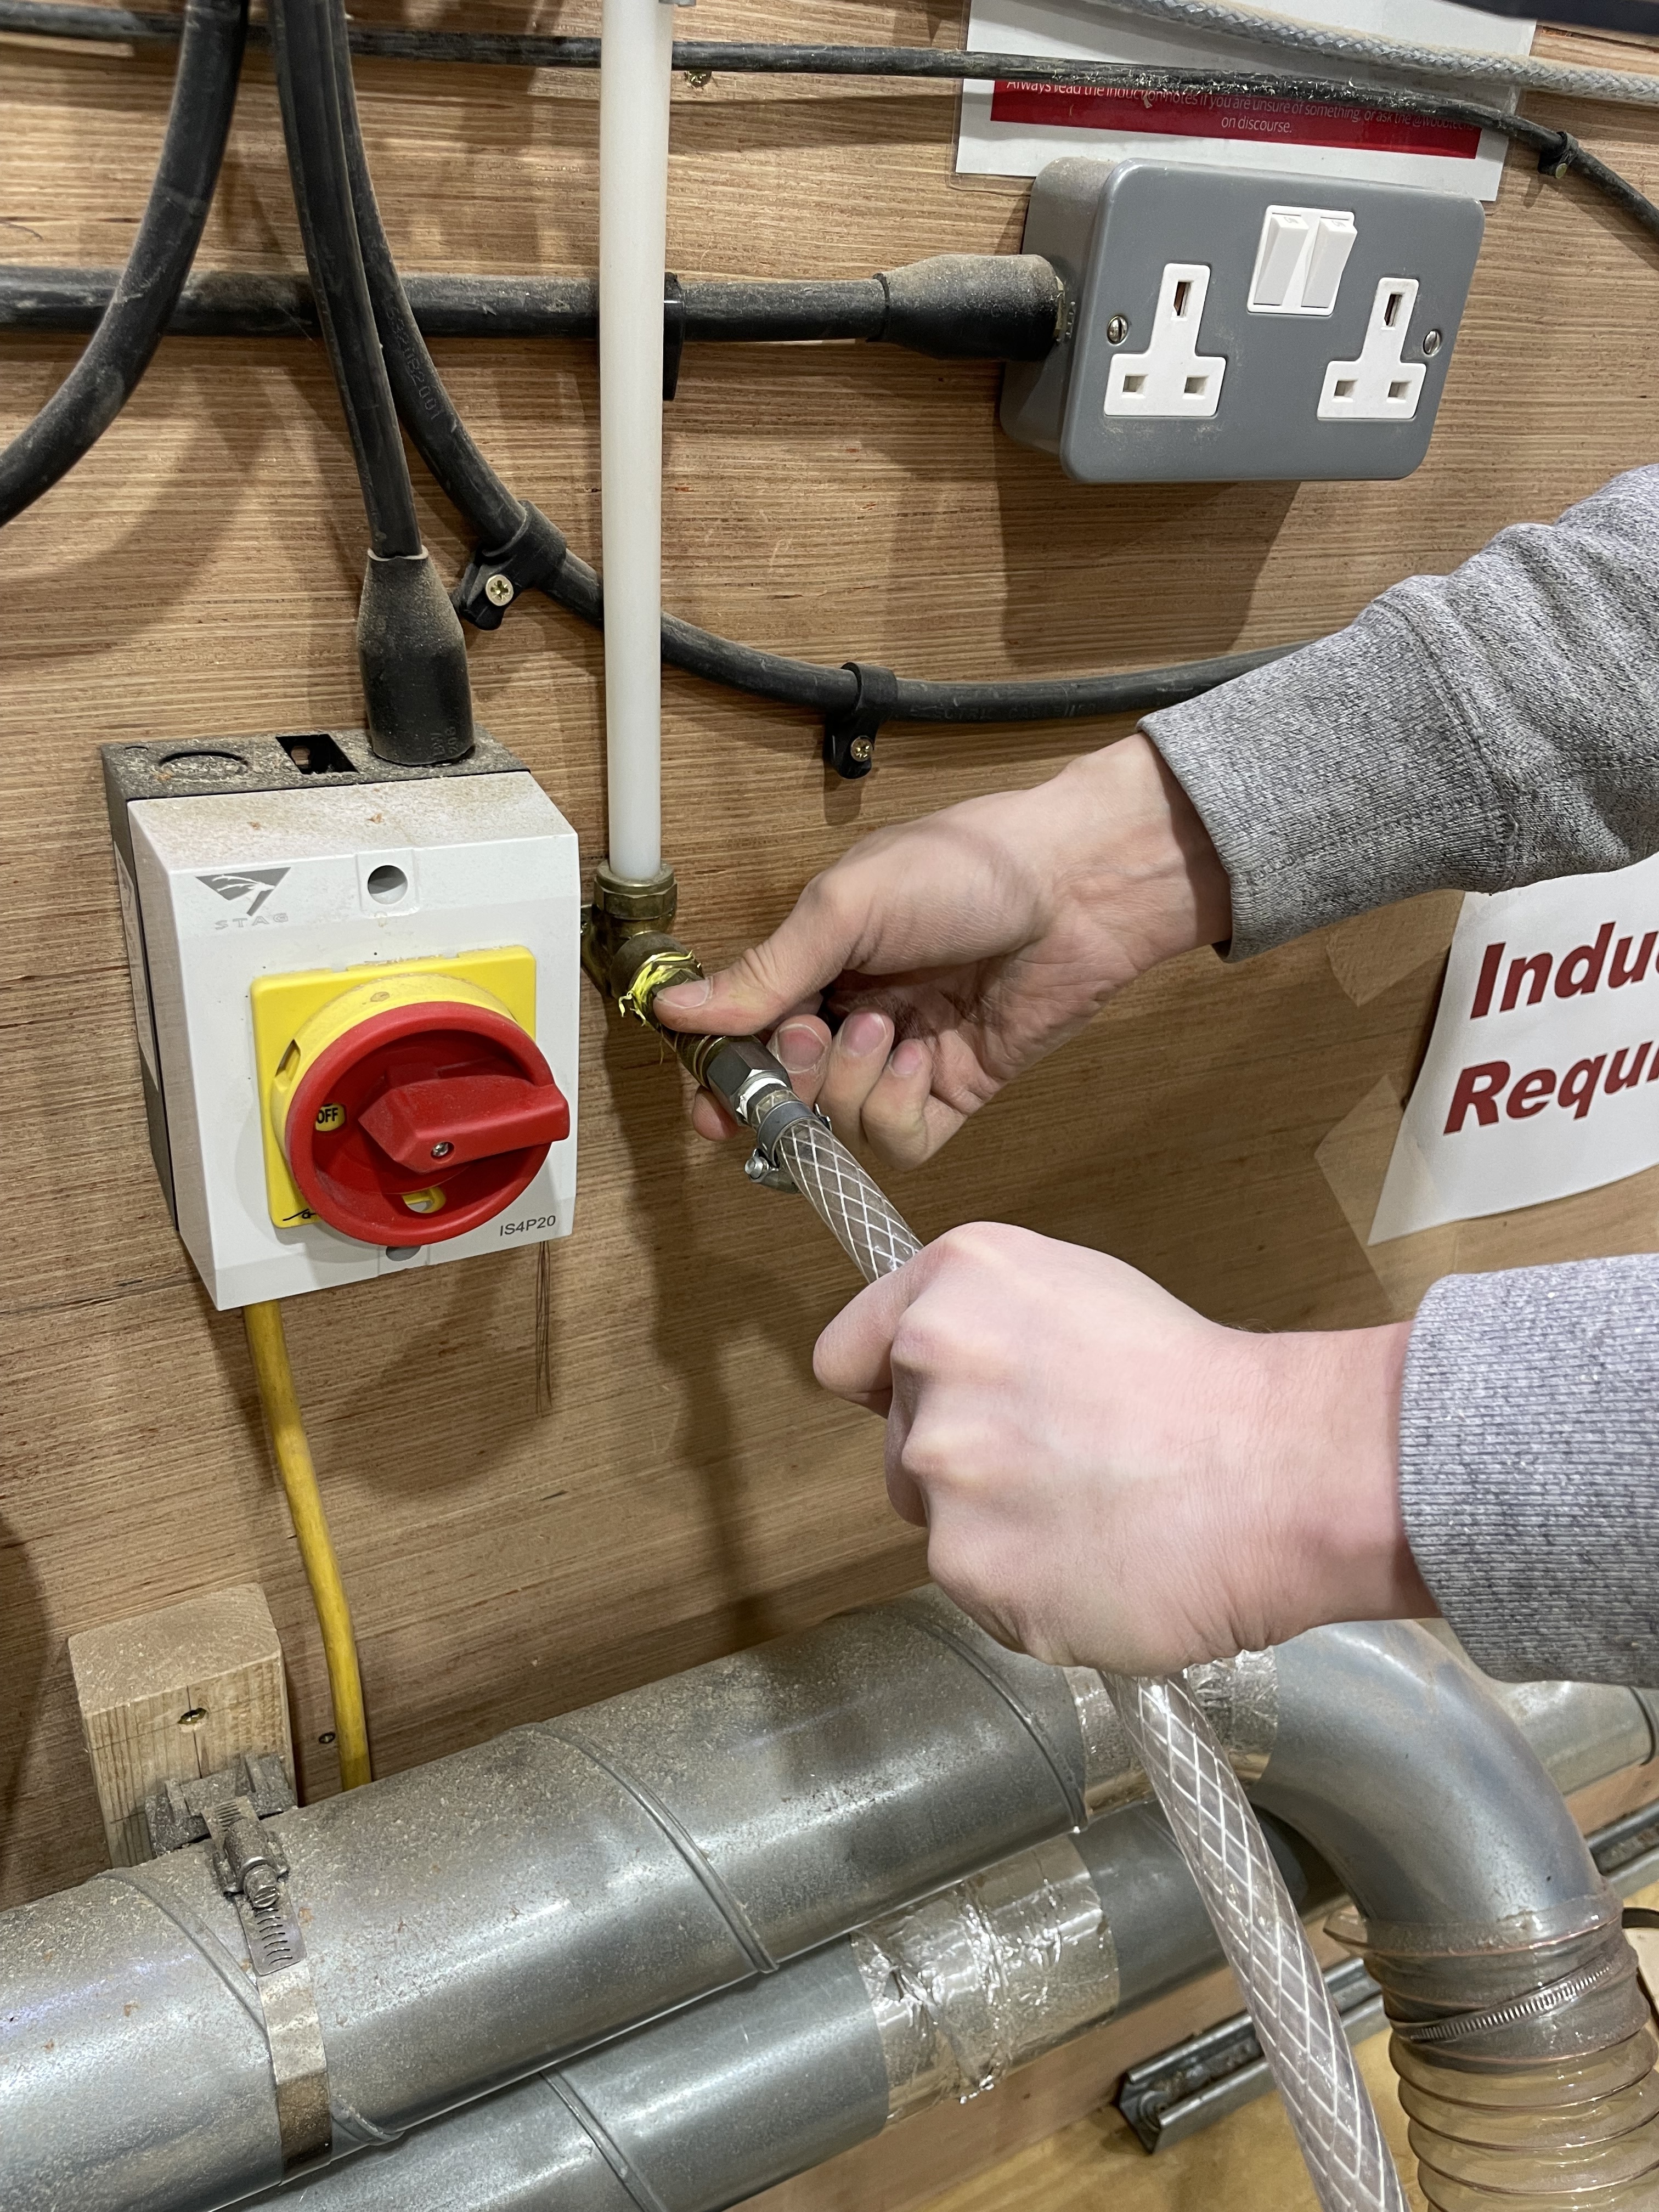
- This machine should not be operated without induction.
- This machine should not be left unattended during operation.
- This tool should not be used while alone in the space - lone working rule.
If you notice that any of the information contained on this tool page is misleading or potentially an unsafe practice, please notify @woodtechs.
Wadkin BAOS 12 Planer Thicknesser
Details
click/tap to expand for dimensions and photos
Thicknessing Capacity: 310x180mm
Length of Table: 710mm
Width of surface tables: 310mm
Rise and Fall of surface tables: 15mm
Maximum depth of rebate: 11mm
Length of fence: 760mm
Height of fence: 110mm
Fence cants up to: 45
Cutter block diameter: 100mm
Speed of cutterblock: 5000rpm
No of cutters: 3
Cutterblock Power: 2.2Kw
Feed Roller Diameters: 50mm
Feed Speeds: 4.5 & 9meters/min
Gross Weight: 445kg
Floor Space: 1200x1220mm
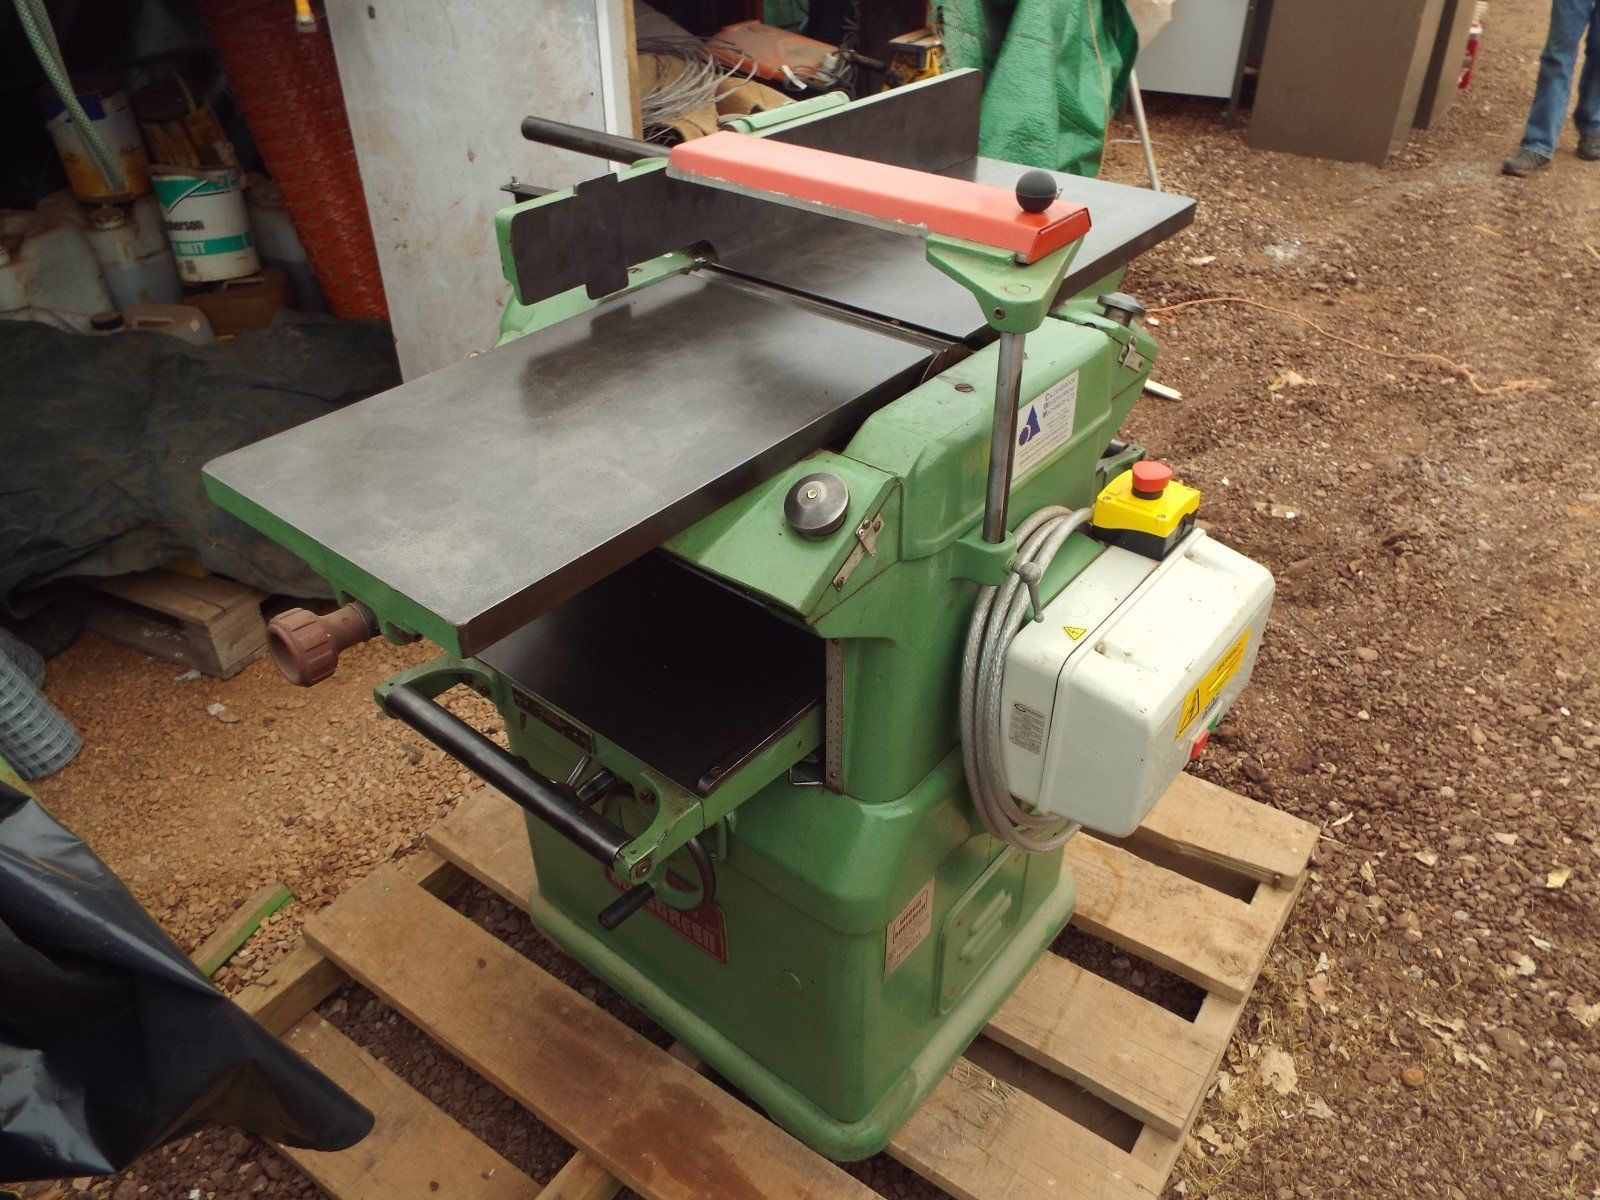
This is a 3 phase planer/thicknesser, for smoothing and squaring timber to an accurate and flat shape.
Condition Notes
2nd hand in very good condition.
Maintainers
Risk Assessment
Planer/Thicknesser Risk Assessment
Induction and Training (draft)
Planer/Thicknesser waiting list (Add link when list created)
Expand for Practical Assessment details
What to do ahead of time
The expectation ahead of an assessment is that you have thoroughly read through the material on this page, and are comfortable demonstrating your ability to safely use the tool. If necessary, watch the videos at the bottom of the page. Please be considerate of your inductor’s time.
Before being able to request an assessment, you must get a 100% on this quiz to show that you understand the safety precautions and theory behind the tool: Planer/Thicknesser Assessment Quiz
What to bring
You will need to bring with you a rough sawn board to mill which must be between 20 and 70mm thick, 250 and 1500mm long and no more than 310mm wide.
What will be covered
In the practical assessment you will show the inductor you can use the Planer/Thicknesser safely by:
- Setting up the machine for surface planing and jointing, along with the necessary safety checks.
- Surface planing one face of your board
- Jointing one edge of the board square to the planed face
- Reconfigure the machine for thicknessing
- Thicknessing your board
- Shutting down the machine and packing away
What the Planer/Thicknesser does:
The planer/thicknesser is used to create 3 square, flat edges. Used in combination with the Table Saw, this combination will yield a perfectly square flat board, ready for use.
The Planer is used to get one flat face and one square edge, using the table and fence, which directs the timber over the cylindrical cutters. Once planed, the board is passed through the thicknesser, giving your workpiece 3 edges square and flat, before moving onto the Table Saw for the final part.
PPE and Safety Review:
All of these rules must be obeyed at all times. A failure to comply may result in a ban.
- Do not let any part of your body or clothing come within 30cm (1ft) of the blade whilst it is moving. Instead, use push blocks with a notched end to retain greater control (more on this below)
- Do not wear loose clothing
- Ensure long hair, jewellery, and any clothing drawstrings are securely tied back
- Safety glasses are mandatory
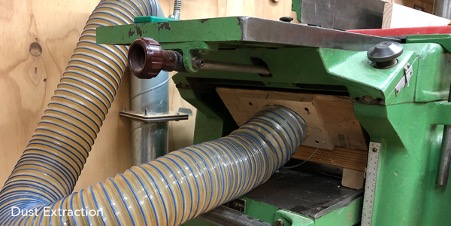
- Extraction must be used at all times
- Masks should be used by all woodshop users
- Ear defenders or ear plugs must be offered to everyone in the woodshop, as this is a very loud tool
- Sensible footwear with sturdy toes and a small heel should be worn at all times in the workshop. Steel toe-caps are a bonus.
- Do not wear gloves - they are an entanglement risk with woodworking machine tools
- As with any power tool - be sober and alert. Do not use the planer/thicknesser when tired
- No Lone working with Power Tools
- Always isolate the tool (turn off the power) before going within 30cm of the blade, or exposing the blade
- Defects must be reported to @woodtechs
- If the machine is struggling, making strange noises or smoke is coming out. Turn off and isolate the machine immediately, contact the @woodtechs, and place an “out of order” note on the machine and place a zip tie on the isolator.
Unacceptable materials
- any non-wood material
- MDF
- Plywood
- Particle board
- Lacquered or painted boards - thoroughly scrape it off first
- Nails. Check any wood thoroughly with the nail finder.
- boards less than 250mm long (hand plane these)
- End grain - it will tear out on your piece and dull the blades
- get permission for woods known as heavy irritants - typically exotic hardwoods
- if in doubt, ask @woodtechs
Anatomy of the tool:
(click/tap to expand)
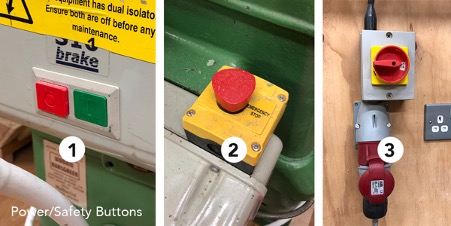
1. Controls - the controls for the planer/thicknesser are accessible from the operator’s position. The green button is used to turn the machine on, while the red turns the machine off. Please Note: these buttons do not isolate the machine.
2. Emergency Stop - As well as the red push stop button next to the power button, there is also an emergency stop button below the in-feed table, to make sure the operator can always reach one easily if needed. Remember - emergency stop buttons are generally damage limitation - bad things are usually already happening by the time they are hit. Try to avoid this by preparing carefully.
3. Power Control - Once the power is activated by tool control, you can isolate/de-isolate the machine using the switch on the wall, then use the green power button on the planer/thicknesser controls to turn it on.
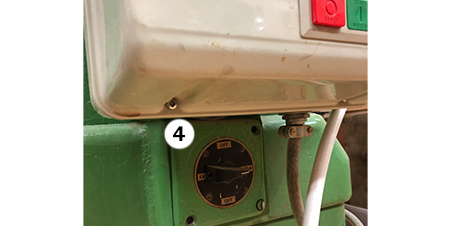
4. Feed Rate Control - This must always be checked before starting a cut on both the planer and thicknesser. When using the planer, the dial must be set to OFF. This is to prevent the feed rollers pulling the dust extraction into the machine. When thicknessing, this must be set to either slow or fast, but NEVER OFF, as your wood will not be pulled through the machine. Slow will give you a better finish, and should be used when making final passes.
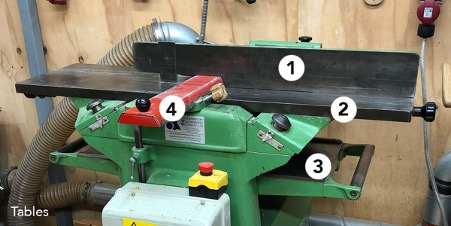
1. Planer Fence – This metal fence sits on the Planer in-feed and out-feed tables. It remains perfectly perpendicular against the tables, but can be adjusted to create bevelled edges.
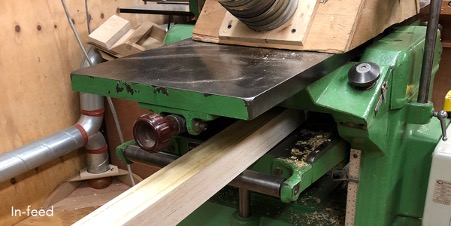
2. Planer Table – This is the large, flat steel surface with a break in the middle containing the cutting blades. Timber is fed from right-to-left along this table, passing over the cutting blades. If long pieces of timber are to be planed, a second person or out-feed support is needed to ensure the board remains coplanar to the out-feed table.
3. Thicknesser Table – This is the large, flat steel surface that sits below the planer table. Timber is fed from left-to-right along this table, passing between the table and the cutting blades. More detail on how boards are fed through the machine are detailed further down.
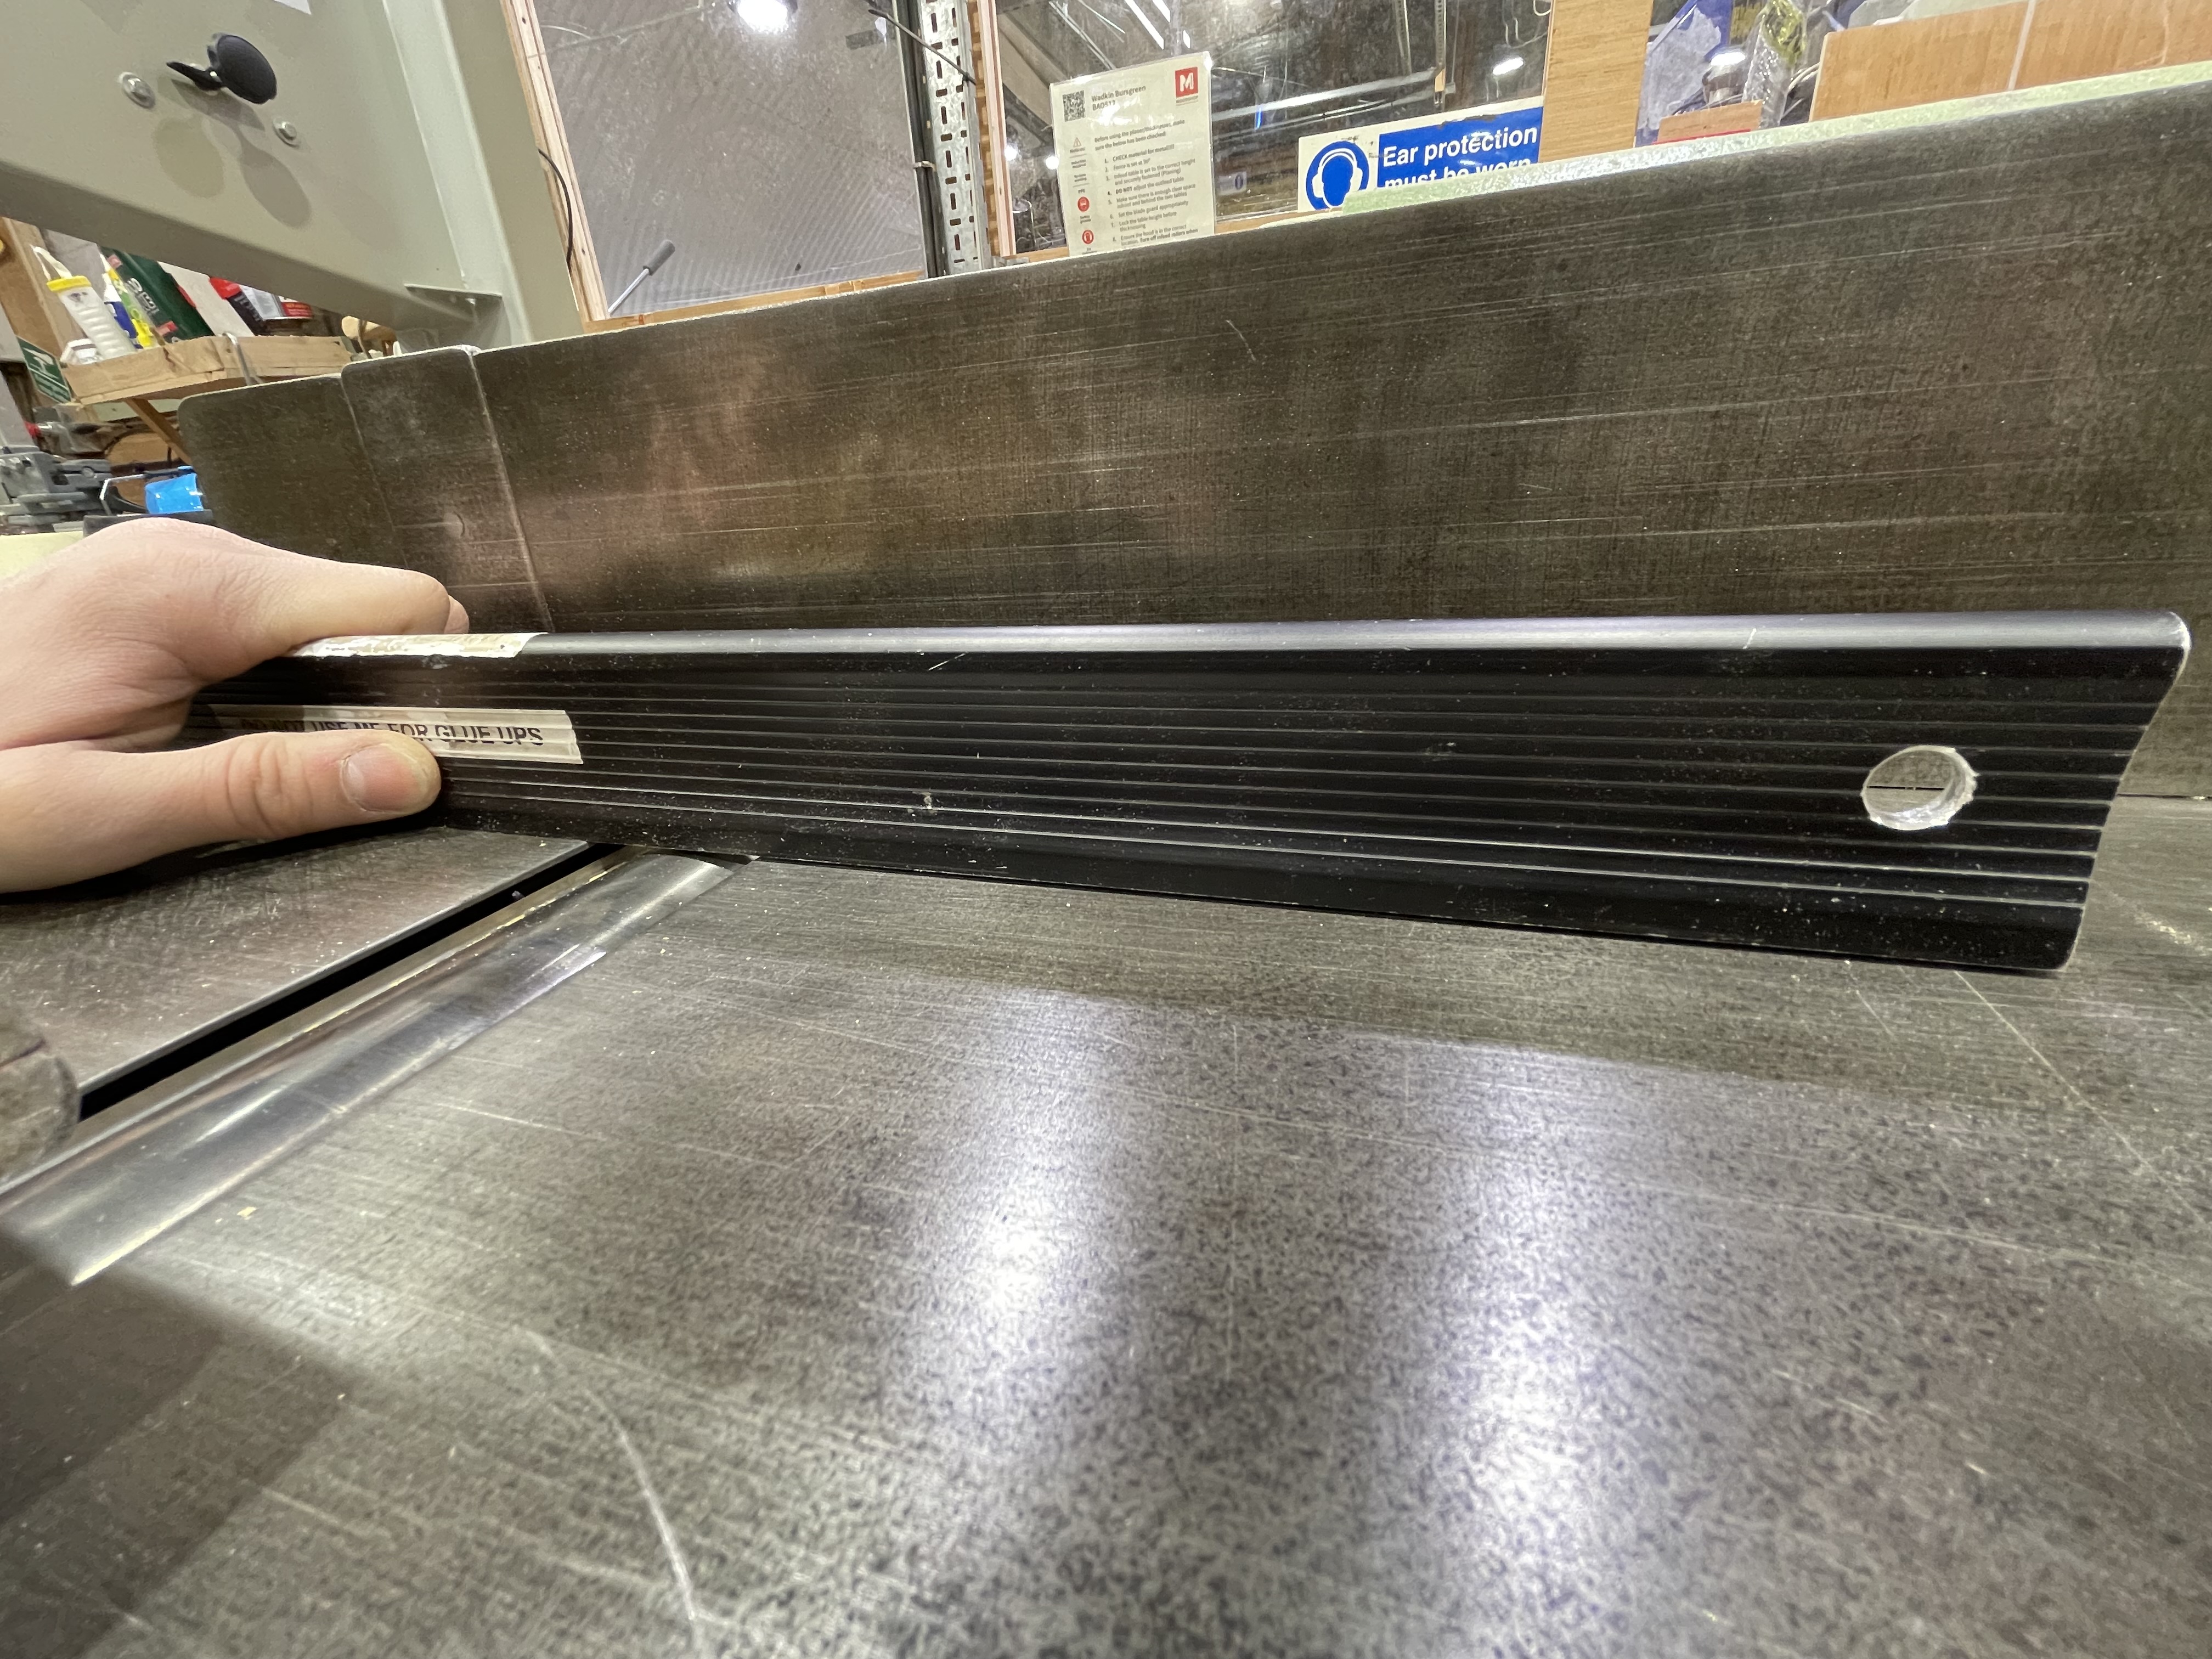
4. Planer Blade Guard – This guard should always cover the cutting blades, unless during specific times, which will be outlined below. The blade guard is also used to keep the dust extraction system against the table when thicknessing.
Moving the Machine
Click/tap to expand

To use the machine, it needs to be moved into the open space, with enough clearance on the infeed and outfeed side for your board:
- Before moving the machine, make sure there is pressure in the pneumatic lines - if not, turn the compressor on.
- When the compressor turns off, connect the hose on the machine to the pneumatic outlet on the wall. As soon as the hose is connected, the air will flow and the machine will move on the hover pads.
- To seat the machine, remove the air flow by disconnecting the hose.
- Take care not to move the planer over the textured grip strips on the floor.
(To disconnect, pull back the sleeve on the outlet, while pulling the hose on the planer/thicknesser)
Prepare your material/planning your cut
Click/tap to expand
A planer/thicknesser is used to make boards square, whether these boards are already roughly shaped or not. Some of the more common issues that a planer/thicknesser is used for are shown below, as well as how these boards are to be shown to the planer/thicknesser.
An important consideration is grain direction, understanding the difference between “against the grain” and “with the grain”. Boards should always be planed and thicknessed “with the grain” to mitigate tearout.
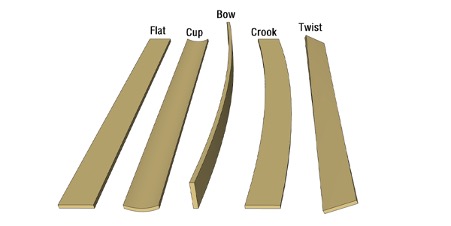
Cupping, bowing and crooked boards – When planning these boards, the crest (hump) of the board should always face upwards.
Twisting – This is trickier to plane. It requires even, constant pressure to be applied when pushing the board over the cutting blades. Ask a @woodtechs for advice.
Planing (Sometimes called jointing) Preparation
Click/tap to expand
General notes before beginning your cut:
- Do not put plywood, MDF or chipboard through the planer
- Do not plane end grain, such as cutting boards or cross-grain timber
- Make sure the extraction selector is on the planer/thicknesser setting
- DO NOT plane boards less than 25cm in length as there isn’t enough area to hold down with the guard in place.
-
Isolate the machine from the Power Supply, to reduce risk or injury during set-up. You cannot re-attach fingers that have been removed by the planer/thicknesser blades.
- As with any material going into one of our powerful and valuable tools - your material must be guaranteed free of screws/nails, etc… Do not put reclaimed timber over or through the planer/thicknesser without discussing with a woodtech.
-
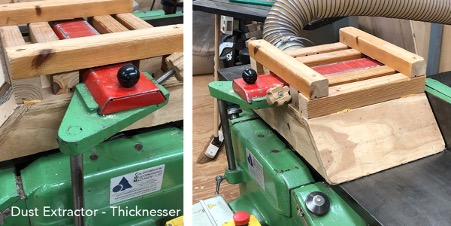
Before using the planer, ensure the dust extraction is placed below the cutters. This is done by dropping the thicknesser table and sliding the extraction system below the cutting wheel. Ensure this does not contact the cutting blades and the feed rollers are turned off (selector on the front of the machine below the power switch box).
- Explicitly, confirm that the feed roller selection switch (black switch under the power control box) is in either of the “OFF” positions.
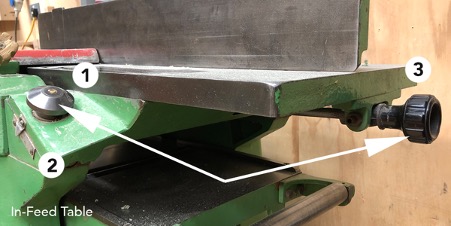
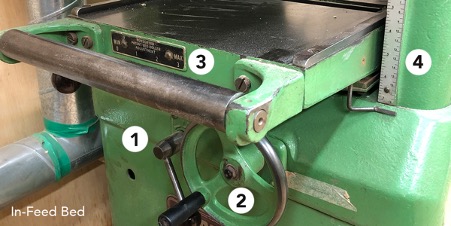
ADJUSTING THE IN-FEED TABLE HEIGHT
-
Unlock the sliding table by turning knob (1) anti-clockwise as well as the drive side table lock cover, which is located behind the in-feed fence.
-
Using knob (3) you’re able to drop the in-feed table, giving you a deeper cut. Clockwise lifts, anti-clockwise lowers. When setting the depth, always turn (3) clockwise after dropping the table to ensure the in-feed table sits co-planar to the cutters.
-
The cut thickness is the difference between the in-feed table and the out-feed table. To reduce the depth of cut, simply release knob (1) and turn knob (3) clockwise. You can use the depth gauge (2) to get accurate measurements.
-
To check the cut depth, place a piece of timber or ruler extending from the out-feed table, over the cutting block to the in-feed table (DO NOT rest the material on the cutting blades). The distance between the table and the bottom of the material will be your cut depth. Aim to have this around 1/32" (0.8mm) to a maximum of 1/16" (1.5mm).
The key thing to remember is to take less material, but more passes. This is the same advice for a hand plane.
-
Before making the cut, ensure knob (1) and the drive side table lock cover has been locked off by turning clockwise.
ADJUSTING THE OUT-FEED TABLE HEIGHT
- DO NOT adjust the out-feed table height. This has been set by @woodtechs. If you notice you’re getting snipe on the end of your boards, contact the @woodtechs as someone has moved the table and it needs to be readjusted.
Positioning the blade guard for cutting
The first step is to decide which face you will be planning and set the guard and fence accordingly.
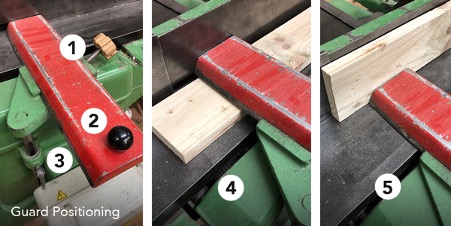
-
Knob (1) unlocks the blade guard, allowing it to slide back and forth using the handle (2), the blade guard must always be positioned against the Fence when using the planer (4). When planning the face of a board, the Blade Guard is to be set no more than 3 mm above the board on the out-feed table. This is to ensure the users hands/fingers cannot pass between the board and the guard. Use (3) to adjust the height of the blade guard.
-
When planning the edge of a board (5), the blade guard is to be moved as close as possible to the timber, covering the exposed cutters. Care must be taken when finishing the cut as the cutting blades will be exposed.
-
At all times, you must set up your cut as close to the front edge of the machine, ensuring the minimal amount of blade is exposed and avoiding the potential of over-reaching.
Setting the fence:
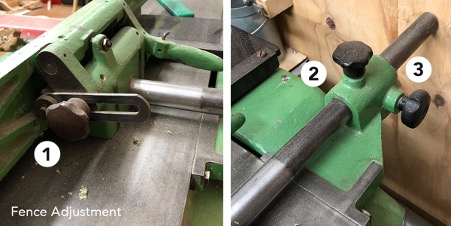
-
Knob (1) unlocks the fence, allowing the user to adjust the angle of the fence, giving boards a chamfered/oblique edge, as opposed to a perfectly 90° edge. If this is adjusted, ensure it’s returned to 90° for the next user. Use an engineer’s square to set the fence - never assume that the last person left it in the correct position.
-
Knob (2) unlocks the fence, while knob (3) moves the fence along the table. When cutting, the fence should be moved against the blade guard, unless planning the edge of a board.
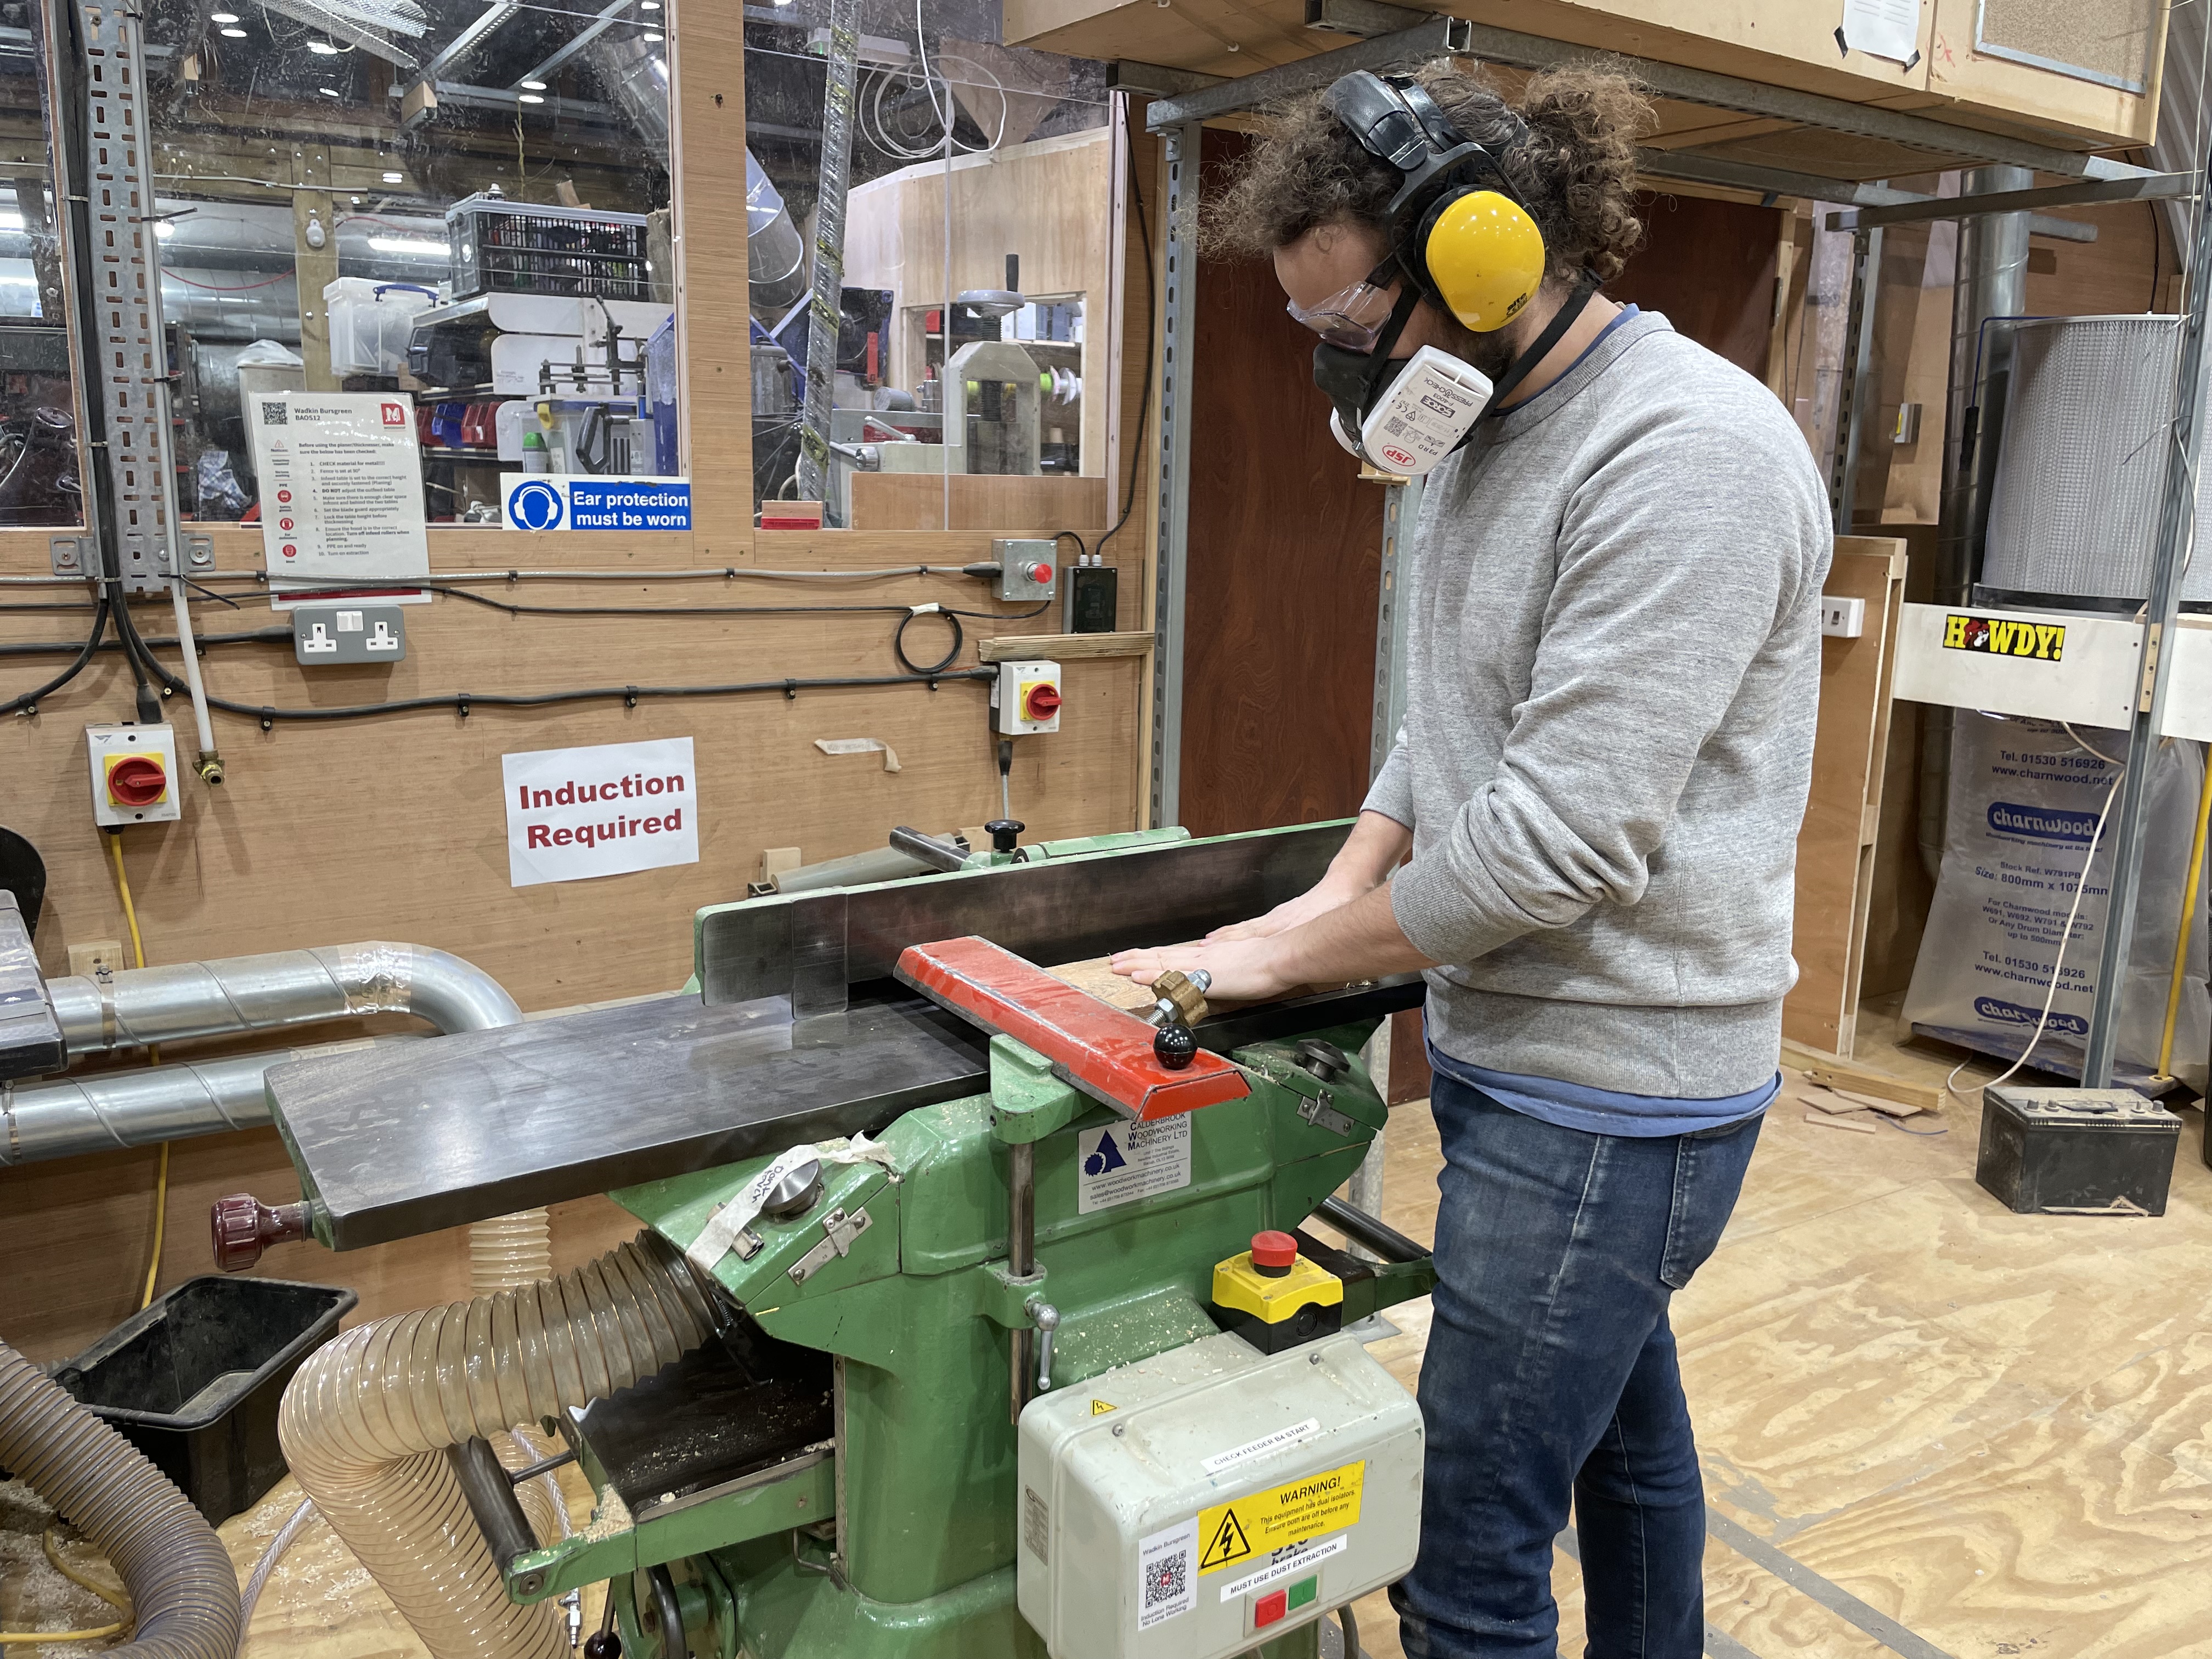
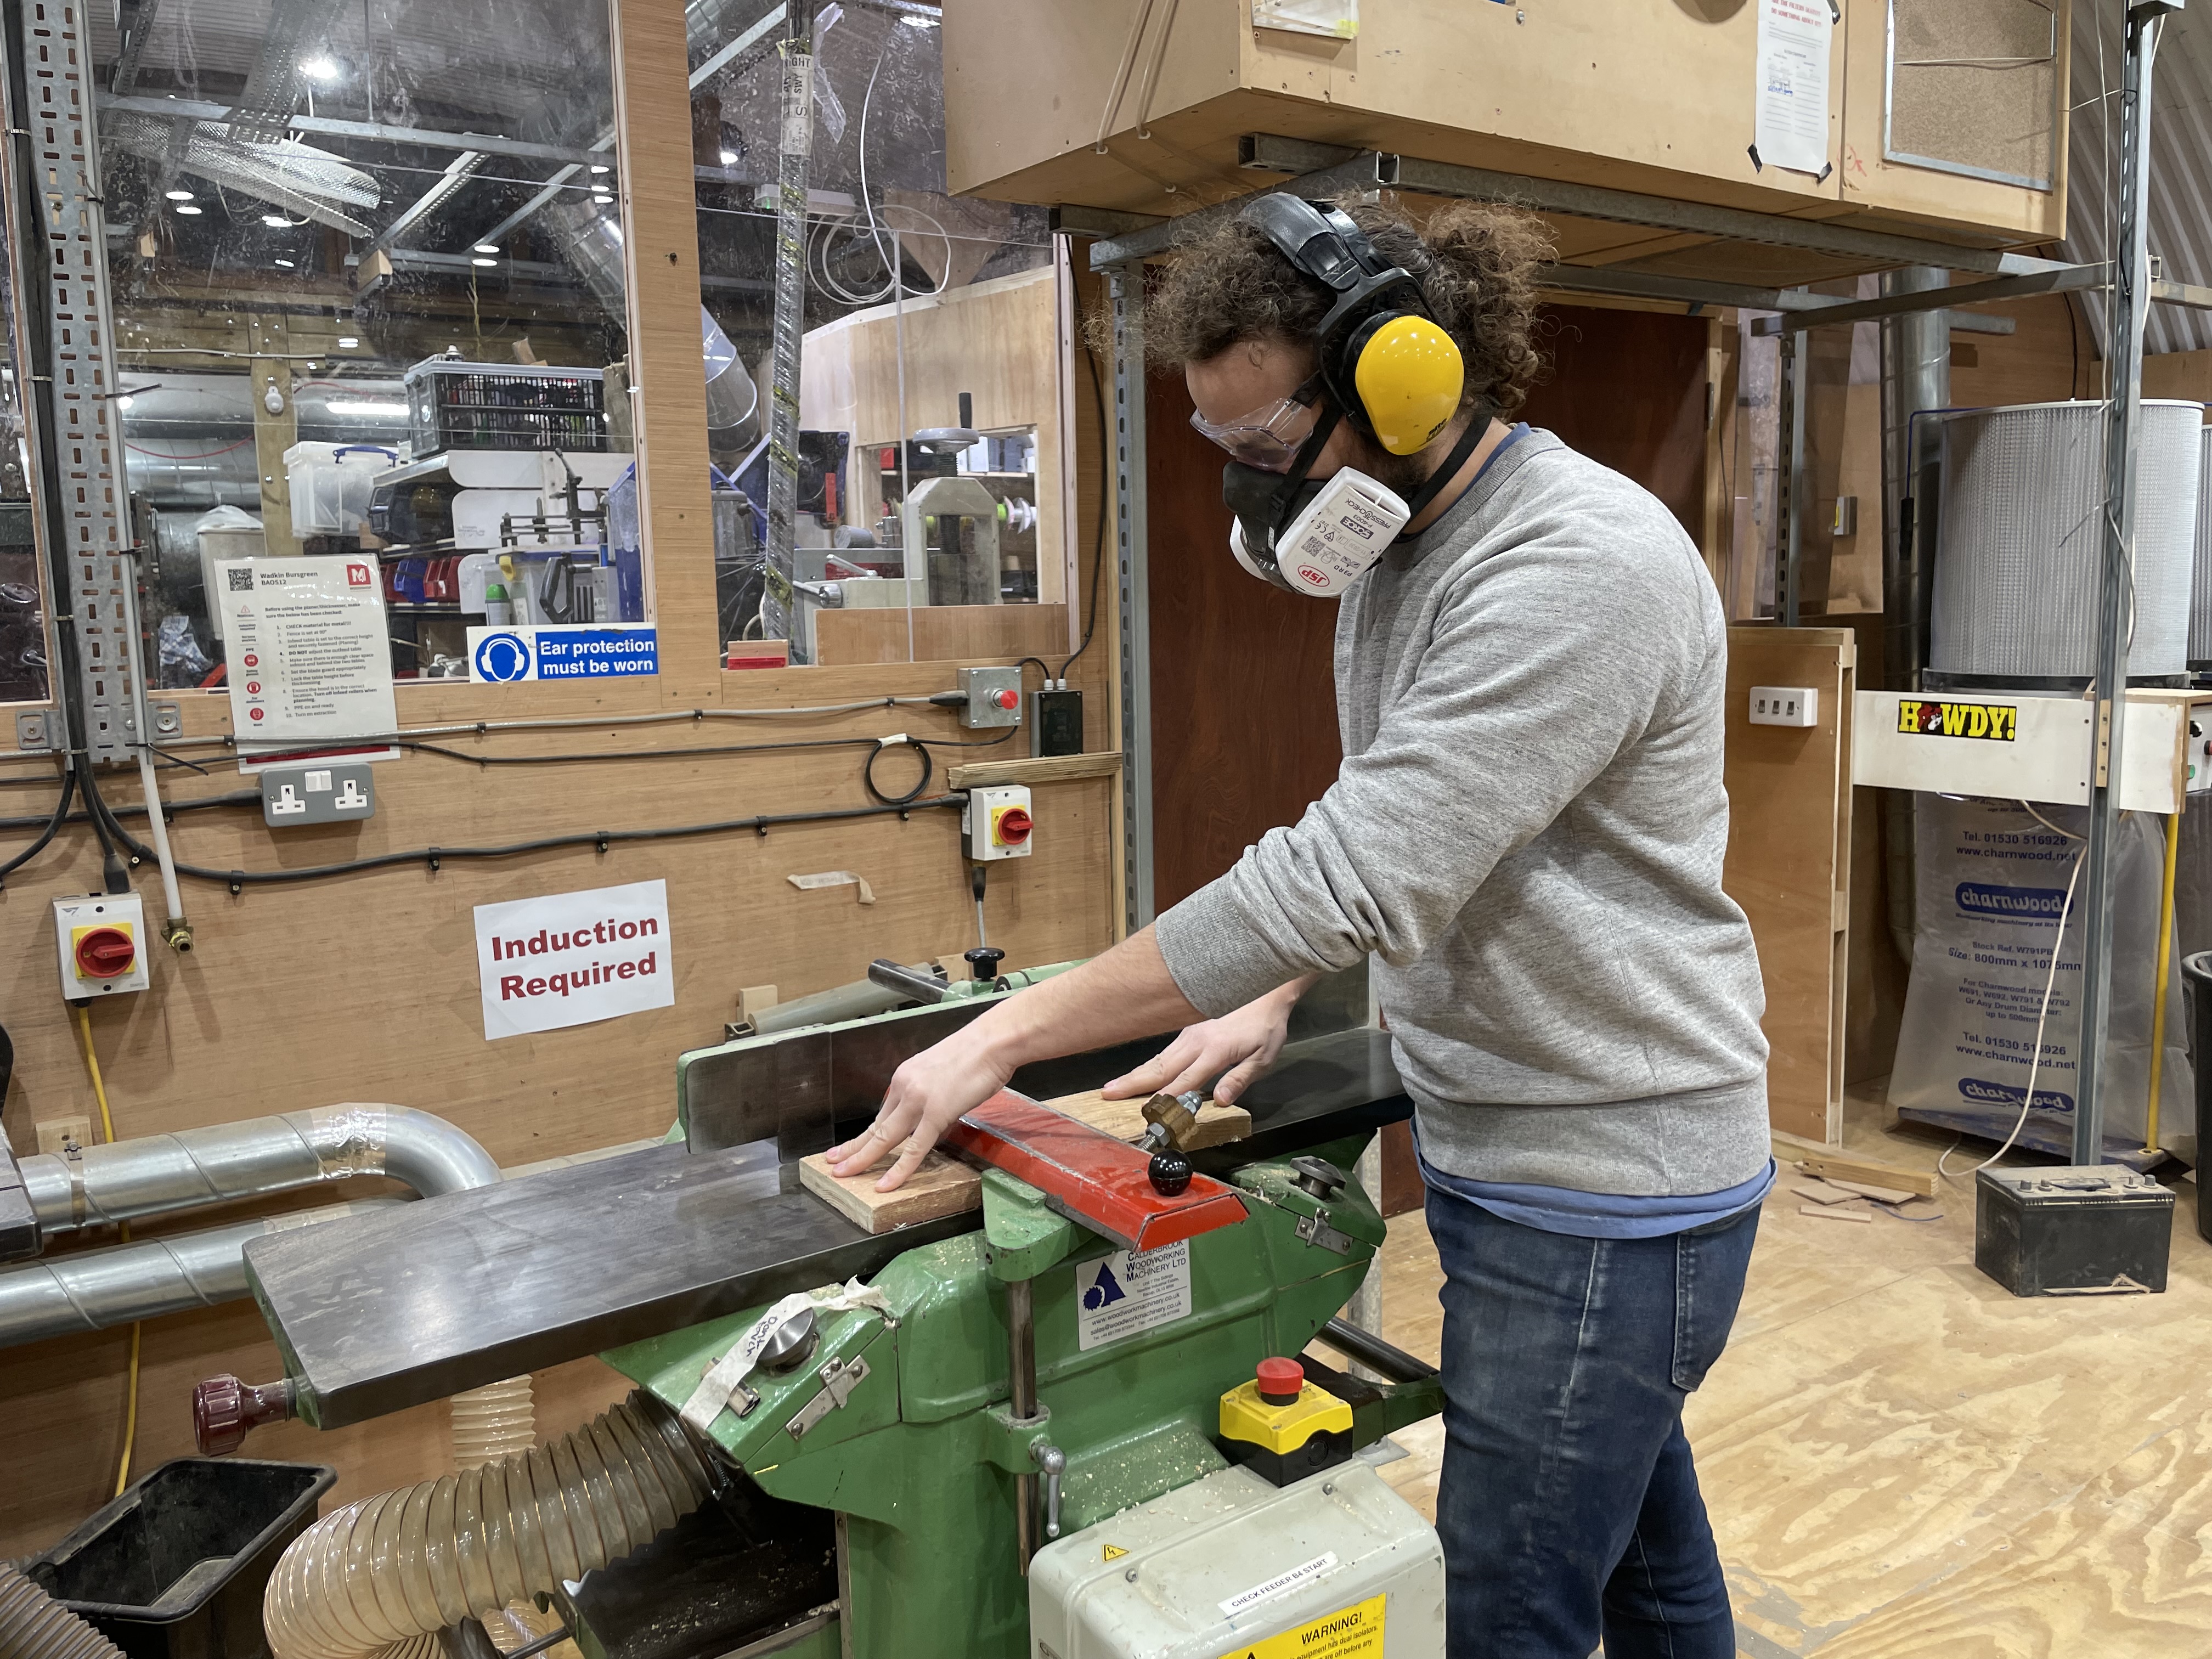
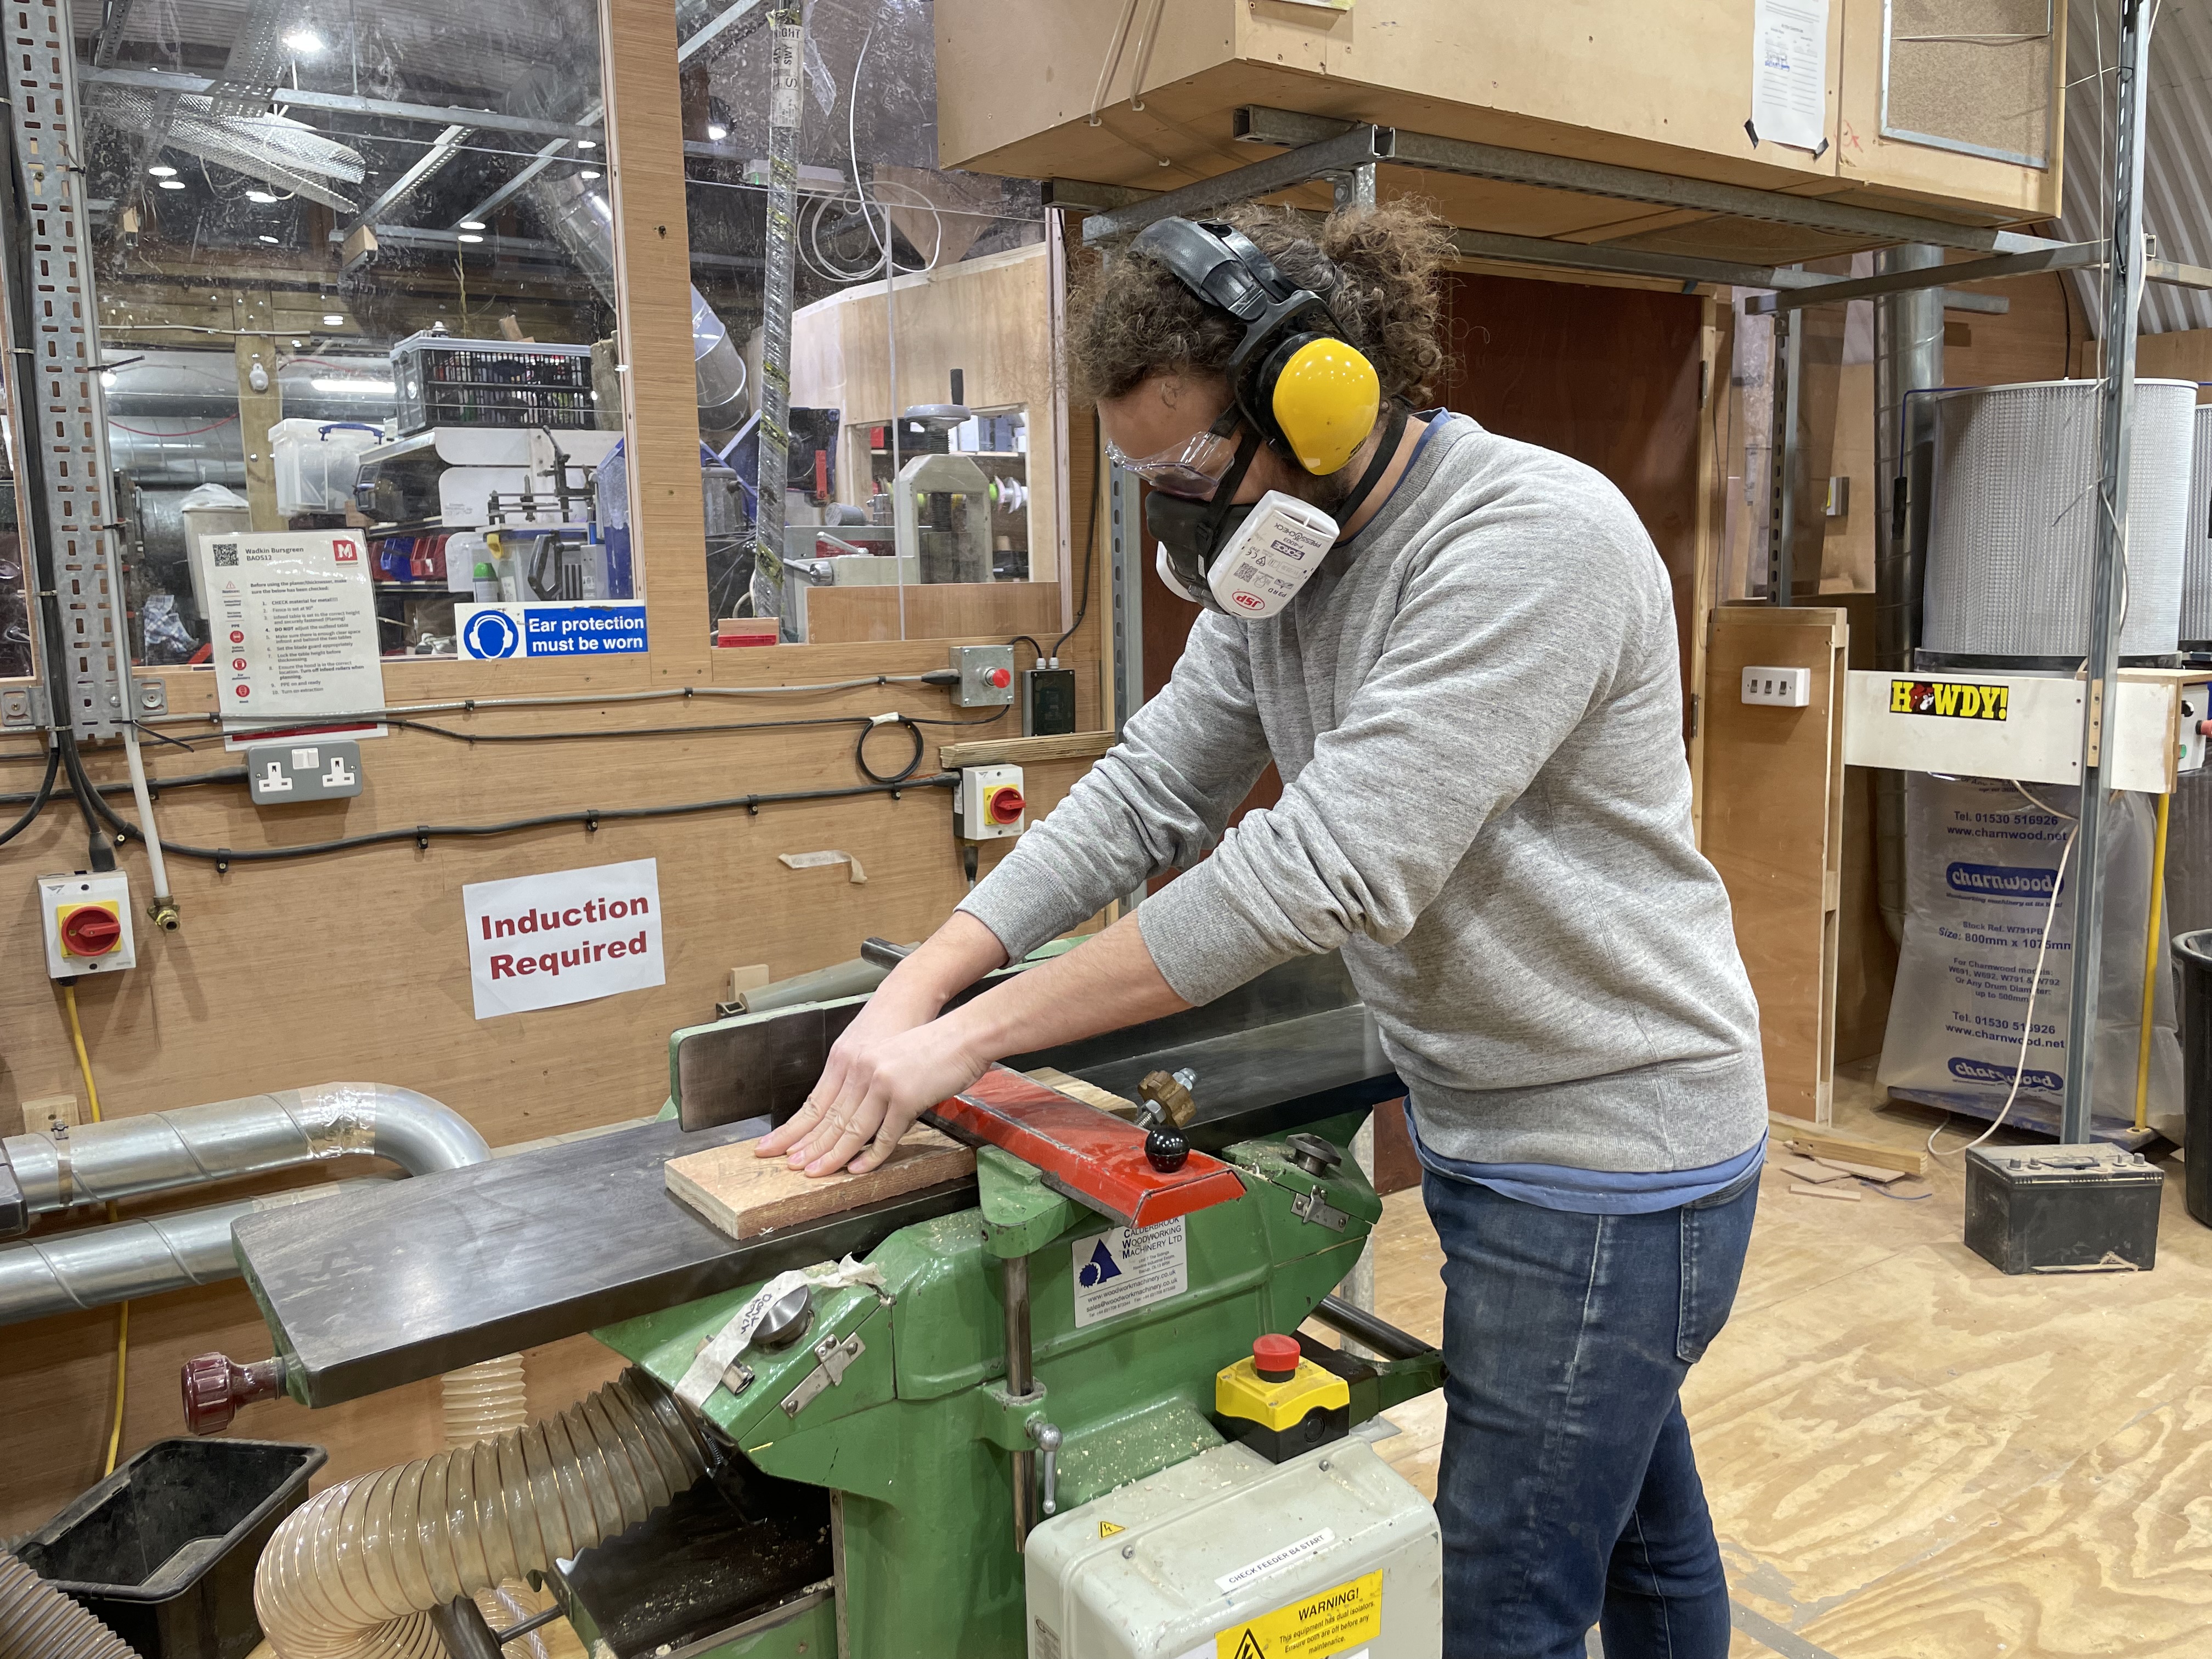
Making the Cut (Face)
Click/tap to expand
-
Ensure dust extraction is turned on, and the selector is set to the planer:
-
Push material along the in-feed table towards the cutting blades, ensuring you keep firm downward pressure as you push the board forward. Do not put all of your weight into the board on the indeed table. If the board is long, use some form of support to hold the board up - this can be the rollers, or another person holding the end up. Do not put downward force directly over the cutters.
-
Keep hands away from the blade guard as much as possible. We have two push-blocks which can be used in place of your hands.
-
When enough material has passed onto the out-feed table, you transfer your left-hand to the out-feed table, passing over the cutting blade. DO NOT run your hand over the blade guard.
-
Your pressure is now concentrated on the out-feed table.
-
Transfer your hand right hand to the out-feed table when enough timber has passed over.
-
Repeat this process until a uniform surface is achieved. Running pencil marks along the board allows you to easily see if you have removed enough material.
Here is a video of a surface planing demonstration
Making the Cut (Edge)
Click/tap to expand
-
Push material along the in-feed table towards the cutting blades, ensuring you keep firm horizontal pressure against the fence, as well as downwards pressure against the in-feed table, as you push the board forward.
-
Keep hands away from the blade guard where possible. We have two push-blocks which can be used if you don’t feel comfortable having your hands close to the cutters.
-
Constant horizontal pressure is to be maintained throughout the entire cut. When edging thinner boards, ensure your hands do not pass over the cutter.
-
Repeat this process until a uniform edge is achieved. Running pencil marks along the board allows you to easily see if you have removed enough material.
-
Once the above process is completed, you will have two perfectly flat surfaces that are perpendicular to each other.
Thicknessing Preparation
Click/tap to expand
General notes before beginning:
-
Do not put plywood, MDF or chipboard through the thicknesser
-
Do not thickness end grain, such as cutting boards or cross-grain timber.
-
Make sure the extraction selector is on the planer setting, and
-
When thicknessing pieces shorter than **(Check distance between in-feed rollers)**cm, use a push stick that’s thinner than your material, to push your material into the machine.
-
No hands or fingers past the external rollers while the machine is not isolated
-
Isolate the machine from the Power Supply to reduce risk or injury during set-up. You cannot re-attach fingers that have been removed by the planer/thicknesser blades.
-
As with any material going into one of our powerful and valuable tools - your material must be guaranteed free of screws/nails, etc… Do not use reclaimed timber with the planer/thicknesser without discussing with a @woodtechs.
-
Thicknessing generally follows planning, as you’re now looking to create a flat parallel face to your first face.
-
Thicknessing is also used to bring boards down to a desired thickness.
-
Thicknessing thinner pieces of timber will require a baseboard of no less than 9mm (discuss with a @woodtechs if you’re unsure).
-
When thicknessing long lengths, ensure the ends are supported, otherwise a step (snipe) will appear on either side of both ends.
Before using the thicknesser, ensure the dust extraction is placed above the cutters. It is locked in place by sliding the blade guard through the dust extraction. Ensure the machine is cleaned after use.
Adjusting the in-feed table height
Release the locking lever (1) and adjust the height of the table using the table rise and fall wheel (2). Precise measurements can be achieved using the measuring guide alongside the in-feed table (4). To help feed your timber through the cutter, adjusting the Pressure Bar Setting (3) is recommended. When cutting softwoods, setting 0-1 is advised, whereas settings 2-3 is preferred for hard woods. If you notice indentations across your workpiece from the out-feed rollers, reducing the Pressure Bar Setting.
Thicknessing the board
Click/tap to expand
For your first pass with the board through the thicknesser, follow these steps:
- Set the feed dial on the side of the machine to either “Fast” or “Slow”.
- Lower the in-feed table so the guide (4) displays appx. 1cm thicker than your board
- Insert the board so the front of it has gone past the first roller. Do NOT place any part of your body or clothing past the external roller and into the machine.
- power the machine on
- unlock the locking lever (1) and slowly raise the table by turning the wheel clockwise
- when the board moves, stop turning the wheel and lock the bed (1)
- if the board gets stuck, push or pull on it gently if enough of it is still sticking out. If it is stuck in the machine, use a push stick thinner than the board to nudge it along, or adjust the pressure bar. DO NOT put your hands into the machine.
You now have the bed indexed to the height of the board. Remove the board from the outfeed side, raise the bed by a 1/2 turn of the wheel or less, and feed the board in again. Repeat as many times as desired to reach the desired thickness.
Additional considerations -
-
Wider boards will likely need a slow feed rate to avoid straining the motor if a deep cut is taken. Where possible, try reducing the amount of strain on the motor. Shallower cuts with more passes is advised. It will also give you a better finish.
-
Once your piece moves through the cutters, it’s advisable to turn the handle 1/4 - 1/2 turn only. This will move the table up slightly and avoid deep cuts being taken.
-
Always lock the locking lever (1) before passing your material through the machine.
Before Use:
-
Ensure the in-feed and out-feed tables are waxed (candle-wax) before use, this allows your timber to slide easily across the surface
-
Ensure all feed tables are completely clear - remove any scraps, offcuts, screws, notes, phones, teacups, etc…
-
Ensure sufficient space available at both ends of the blade for the full length of your cut - move any stacked wood, bins, or other obstacles as necessary.
-
Tell everyone around you what you are about to do - make sure anyone using the workbenches or lathe is aware. Advise them that this is a good time to put on ear defenders and masks (if needed).
Checks before use:
- Infeed table height - adjust to a maximum of 1.5mm below the outfeed table
- Extraction is properly set up
- Area is free of obstruction
- Blade guards are in place
- Are you standing in the right place?
- If the board is long, is it supported?
After use
Isolate the machine and clear of sawdust. Make sure to vacuum within the thicknesser.
Maintenance
Videos
Short HSE video on planing and jointing
References
Wadkin BAOS 12 Planer Thicknesser.pdf (347.9 KB)
Wadkin-BAOS-12-inch-Planer-Thicknesser-Manual-Parts-List.pdf (2.1 MB)
Spare parts enquiry form - Made via their contact page.
Health and Safety documentation
HSE best practice