Motion activated fairy lights - question about voltage

Hi everyone,

I’ve started this project to convert an existing set of fairy lights to a motion activated / dimmable one. It kinda works as a prototype on a breadboard, but now I’m thinking about packaging that into a real project box.

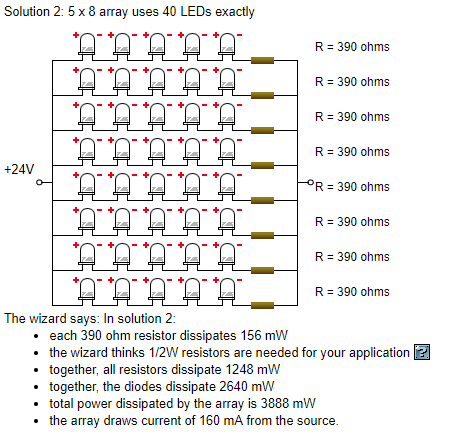
The main problem I’m facing now is how to convert that 24V used by the LEDs into something usable by a Feather (arduino compatible board). As far as I understand the board takes 5V through a voltage regulator.

  • I was thinking about using a voltage divider, but then I got lost in the math and I really don’t know if that’s a good idea to use such a thing when power will be drawn for the LEDs and the arduino board
  • I’m also wondering if using a voltage regulator might be a good idea, because the board also has a voltage regulator. Can these be chained? would that cause any sort of issue?

If anyone has any tips or knowledge to share on the topic I would greatly appreciate, there’s only so far my favourite search engine can teach me stuff.

Thanks!

Ok so I’ve never used a feather but i gather its pretty similar to standard arduinos.

Did you breadboard with the 24v supply and fairy lights or did you use something else and a light that didn’t need 24v?

Also a voltage divider will not work to step 24v down to 5v as they can only make really small currents unfortunately. There is lots of modules you can buy that will though - just search dc-dc converter and you’ll get lots of cheap options, just make sure it can do enough power.

Yeah you can chain voltage regulators together e.g to step your 24v down to 5v then the feather steps down to 3.3v or whatever it likes.

1 Like

Assuming you want to control 40 LEDs that have a forward voltage of 3.3v @20ma - If you have a 24 volt power supply you can power 5 LED strips (if they’re already in series) in parallel with a 390 ohm resistor on each strip for a 5 x 8 array, then use a logic level mosfet (Arduino voltage) like this one https://www.vishay.com/docs/91328/91328.pdf - I made a really quick search, there are probably better or cheaper ones available, look for those with low drain-source on resistance (RDSon). You could also control the LEDs with non-logic level mosfets and opto-couplers instead. You’ll probably need a step-down (linear or buck) regulator for the Arduino (as per Calum’s suggestion). I’m also assuming you’re not concerned about efficiency/battery life.

Use this wizard to create a diagram like the following: http://led.linear1.org/led.wiz
Capture

1 Like

Ah that makes sense. I guess chaining voltage regulators is probably the best then!

Thanks!

Did you breadboard with the 24v supply and fairy lights or did you use something else and a light that didn’t need 24v?

I did breadboard with the 24V, but using two power supplies, on 5V and one 24V (and connecting the two grounds). I needed it to understand how MOSFETs works, it still melts my brain :slight_smile:

Thanks Edd, really insightful!
But I’m using an existing fairy light strip, which is already soldered and made for that power supply.
I’m basically putting a MOSFET at the end of the LEDs chain that I can control from the arduino with a PWM output pin.

Ah yes lol, I think a MOSFET at the end will do the trick. You won’t need to work out the LED resistances etc since that part has already been done.

To get your 5V from 24V I suggest a module like this and to drive your lights a circuit like this:

Where X3 is the PWM output of your feather board, PWM5V is grounded, 24VDC and X1 connect to your power supply, “Motor” and X2 to your fairy lights. Discussion and maths in this stackexchange link

1 Like